> ## Documentation Index
> Fetch the complete documentation index at: https://docs.envzero.com/llms.txt
> Use this file to discover all available pages before exploring further.
# Bitbucket Server Integration
> Integrate Bitbucket Server or Data Center with env zero using a self-hosted agent and a personal access token with Repository write permissions.
Note
Bitbucket Server is only supported on env zero Organizations signed up for our [Self-Hosted Agent](/guides/overview/security-overview/#self-hosted-agents).
Minimum supported version: BitBucket Server v7.6
## Initial Bitbucket Server Setup
For env zero to be able to clone your code and post back commit statuses when running [Plan on Pull Request](/guides/admin-guide/environments/plan-on-pull-request) you need to provide it with an access token with write permissions.
This only needs to be done once for your Organization.
1. Create a [Personal access token](https://confluence.atlassian.com/bitbucketserver076/personal-access-tokens-1026534797.html#Personalaccesstokens-usingpersonalaccesstokens) on your Bitbucket Server.
* We recommend creating the token for a bot user - as that is the user that will post back commit statuses and comments.
* The user must have access to each repository you would like to be able to use with env zero.
* The token must have "Repository write" permissions.
2. Encode the personal access token, and the username it was generated for, in the format of `username:token` - in base64. The encoded value should be used in the agent installation process as a helm value - `bitbucketServerCredentialsEncoded`. Check out our [Self-Hosted K8S agent docs](/guides/admin-guide/self-hosted-kubernetes-agent/custom-optional-configuration) for more information.
3. Install/update the agent with the new value
## Webhooks Integration
Adding Webhooks is required to support [Continuous Deployment](/guides/admin-guide/environments/continuous-deployment) and our [Plan on Pull Request](/guides/admin-guide/environments/plan-on-pull-request) features on Bitbucket Server.
1. Open your repository page in Bitbucket Server.
2. Click on the settings icon.
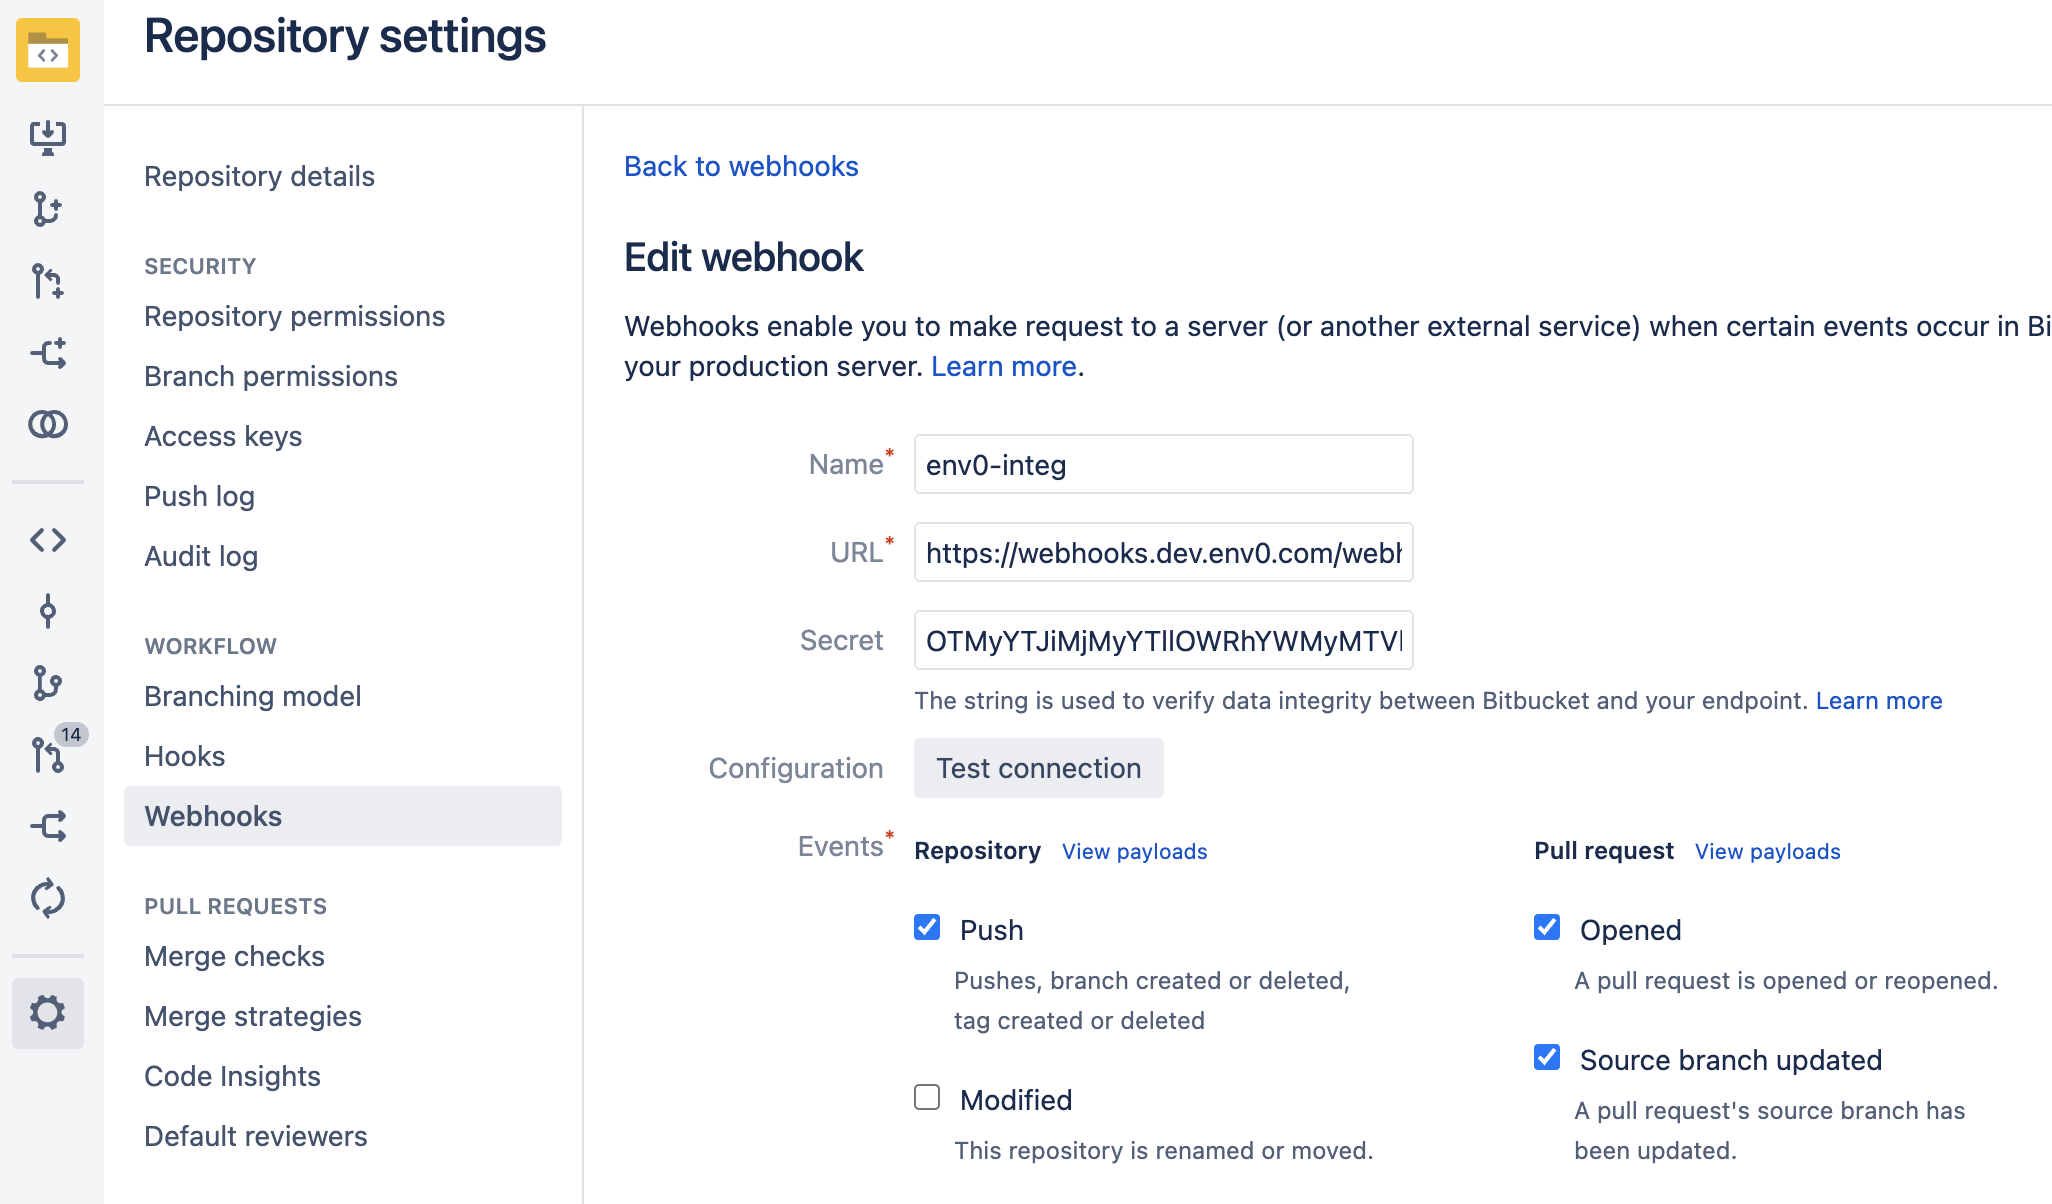
3. Enter the **Webhooks** page.
4. Click on the "Create webhook" button.
5. Give it a name, like "env zero integration".
6. Copy & Paste the URL and Secret values from the env zero Template creation page.
7. Mark **ONLY** Repository **Push** and Pull Request **Opened** and **Source branch updated**, as shown in the picture below.
8. Make sure the webhook is marked as Active.
9. Click on the **Create** button.
 ## Next steps
* [Standard Bitbucket Integration](/guides/admin-guide/templates/bitbucket-integration) - Connect cloud-hosted Bitbucket repositories.
* [Managing VCS](/guides/admin-guide/manage-vcs) - Manage all VCS provider connections in one place.
* [Self-Hosted Kubernetes Agent](/guides/admin-guide/self-hosted-kubernetes-agent/self-hosted-kubernetes-agent) - Deploy the agent required for self-hosted VCS.
## Next steps
* [Standard Bitbucket Integration](/guides/admin-guide/templates/bitbucket-integration) - Connect cloud-hosted Bitbucket repositories.
* [Managing VCS](/guides/admin-guide/manage-vcs) - Manage all VCS provider connections in one place.
* [Self-Hosted Kubernetes Agent](/guides/admin-guide/self-hosted-kubernetes-agent/self-hosted-kubernetes-agent) - Deploy the agent required for self-hosted VCS.