> ## Documentation Index
> Fetch the complete documentation index at: https://docs.envzero.com/llms.txt
> Use this file to discover all available pages before exploring further.
# Using Self-Hosted VCS
> Connect self-hosted VCS providers to env zero with agent proxy support, covering GitHub Enterprise Server, Bitbucket Data Center, and GitLab.
Connect your Self Hosted VCS to env zero. Once set up, you can create self-hosted VCS [templates](/guides/admin-guide/templates) and [VCS environments](/guides/admin-guide/environments/#based-on-a-direct-vcs-integration) within the system. Manage all VCS connections in a centralized page, allowing you to apply changes across all templates and environments.
**This feature is available exclusively to customers using [self-hosted agents](/guides/admin-guide/self-hosted-kubernetes-agent)**
**Supported VCS**
* [GitHub Enterprise Server](https://docs.github.com/en/enterprise-server)
* [Bitbucket Data Center](https://www.atlassian.com/software/bitbucket/enterprise/data-center) (Server)
* [Offline GitLab](https://docs.gitlab.com/ee/topics/offline/)
**Using a self-hosted VCS provides you with all the features similar to a cloud-based VCS**. including:
* [Plan on Pull Request](/guides/admin-guide/environments/plan-on-pull-request)
* [Continuous Deployment](/guides/admin-guide/environments/continuous-deployment)
* [PR Comments Commands](/guides/admin-guide/environments/plan-and-apply-from-pr-comments)
* [Module Registry](/guides/admin-guide/private-registry)
* [Project-level Custom Flow](/guides/admin-guide/custom-flows/project-level-custom-flow)
* [Approval Policies](/guides/policies-governance/approval-policies)
## Add New VCS Connection
You can create a new connection in two ways; when creating a new template or through centralized management.
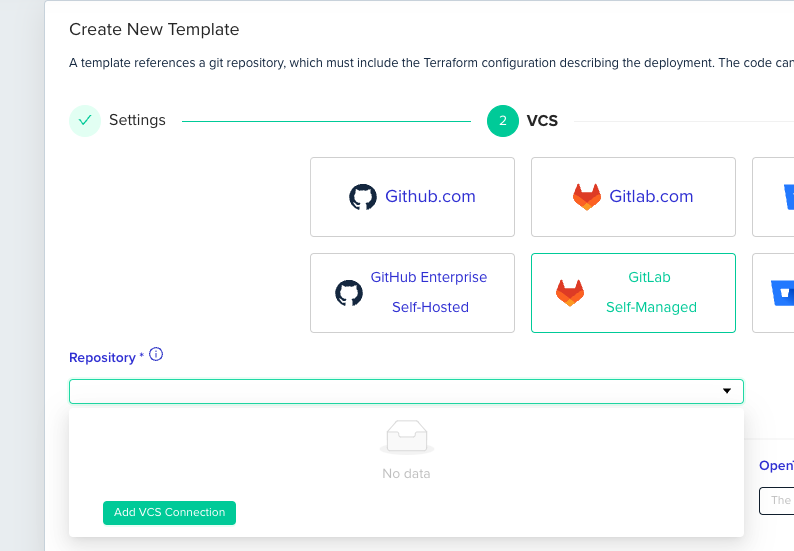
### Option 1 - Create VCS Connection from Template Creation
1. When configuring the VCS type, select one of the self-hosted supported VCS options.
2. Click the Repository dropdown and select "Add VCS Connection".
 ### Option 2 - Create VCS Connection from VCS Settings
1. Go to "Organization Settings," select the "VCS" tab, and scroll down.
2. Click "Create Connection"
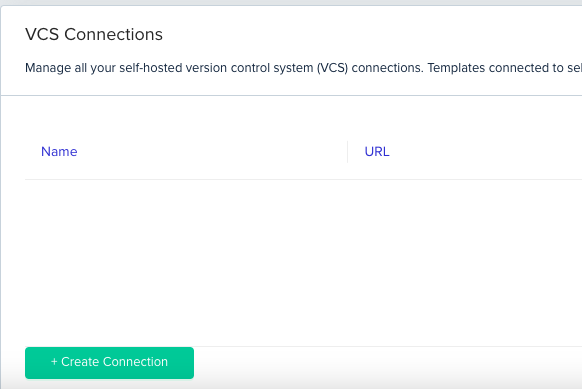
### Option 2 - Create VCS Connection from VCS Settings
1. Go to "Organization Settings," select the "VCS" tab, and scroll down.
2. Click "Create Connection"
 ### Create VCS Connection
1. Choose Self-Hosted in the picker
2. Choose the VCS type and click **Add** for **Deployment** access.
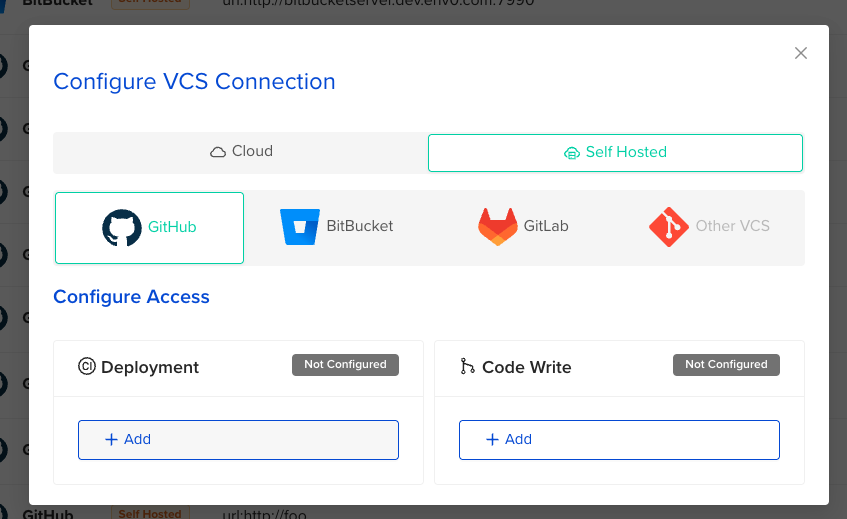
### Create VCS Connection
1. Choose Self-Hosted in the picker
2. Choose the VCS type and click **Add** for **Deployment** access.
 3. Enter Self-Hosted VCS URL
4. Select the "Agent Key" to which all requests will be forwarded ([VCS Agent](/guides/admin-guide/templates/self-hosted-vcs/#configure-vcs-agent-proxy) - Running Proxy).
1. To create a new agent pool, go to **Organization Settings → Agents** and click **Create Agent**. See [Self-Hosted Agents Overview](/guides/admin-guide/self-hosted-kubernetes-agent/overview) for details.
2. The dropdown is available only to users with the "[Edit Organization Settings](/guides/admin-guide/user-role-and-team-management/custom-roles/#custom-role-permissions)" permission.
3.
3. Enter Self-Hosted VCS URL
4. Select the "Agent Key" to which all requests will be forwarded ([VCS Agent](/guides/admin-guide/templates/self-hosted-vcs/#configure-vcs-agent-proxy) - Running Proxy).
1. To create a new agent pool, go to **Organization Settings → Agents** and click **Create Agent**. See [Self-Hosted Agents Overview](/guides/admin-guide/self-hosted-kubernetes-agent/overview) for details.
2. The dropdown is available only to users with the "[Edit Organization Settings](/guides/admin-guide/user-role-and-team-management/custom-roles/#custom-role-permissions)" permission.
3.
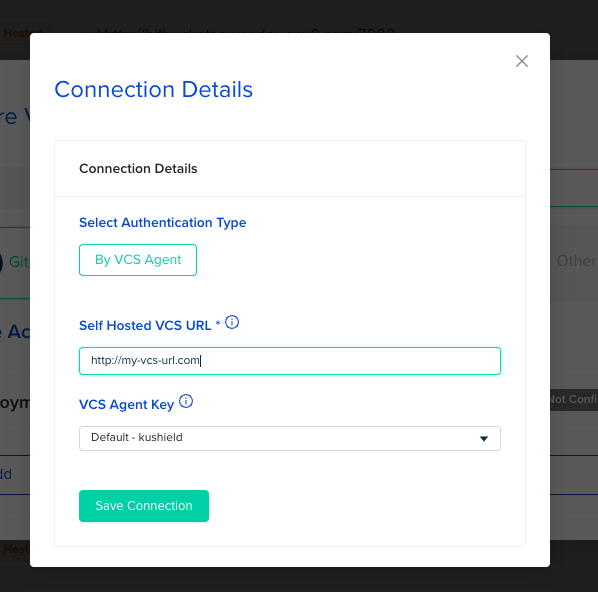 5. Click "Save Connection"
**Forward requests to this VCS Agent**
The intention behind forwarding requests refers to all the requests the platform needs to support the features mentioned above. It does not refer to where the deployment actually runs; it will continue to run based on the project to which it is assigned.
### Configure VCS agent (Proxy)
Running a proxy can be achieved in two ways; as part of the agent's Kubernetes helm chart deployment or as a standalone Docker instance.
#### Agent's Kubernetes Helm Chart
1. The [installation](/guides/admin-guide/self-hosted-kubernetes-agent/self-hosted-kubernetes-agent#installation) is included as part of the agent's Kubernetes Helm chart deployment.
2. By default, the proxy runs when the agent is installed without any special configuration.
3. Proxy Configuration: Configure it in the [values.yml](/guides/admin-guide/self-hosted-kubernetes-agent/custom-optional-configuration) file
1. ```yaml theme={null}
agentProxy:
install: true # default true
replicas: 1 # how many replicas of the agent proxy to use. Default is 1
maxConcurrentRequests: 500 # how many concurrent requests each pod should handle. Default is 500
limits: # k8s (cpu and memory) limits. Example values: 250m and 500Mi (not set by default)
cpu: 250m
memory: 500Mi
bitbucketServerCredentialsEncoded: base64= # Base64 Bitbucket server credentials in the format `username:token (using a Personal Access token)
gitlabEnterpriseCredentialsEncoded: base64= # Base64 Gitlab Enterprise credentials in the form of an Access token
githubEnterpriseAppId: 1 # For more details, check out /guides/admin-guide/templates/github-enterprise-integration
githubEnterpriseAppInstallationId: 1
githubEnterpriseAppPrivateKeyEncoded: "base64=="
```
Refer to the Self Hosted Kubernetes Agent [specifications](/guides/admin-guide/self-hosted-kubernetes-agent/custom-optional-configuration) for additional configuration details.
#### Standalone VCS Agent Docker Instance
1. Run the VCS agent Docker image with the following command:
```shell theme={null}
docker run --env-file ~/path/to/env0.env ghcr.io/env0/vcs-agent:latest
```
2. For more details, see Standalone Docker Agent - [Running a VCS Agent](/guides/admin-guide/self-hosted-kubernetes-agent/standalone-docker-agent/#running-a-vcs-agent-for-on-prem--self-hosted-vcs).
**env zero communication with VCS Agent**
The communication is one-way: the VCS agent connects to the env zero platform. This means that when the env zero platform forwards a request to the VCS agent, we cannot immediately determine if the communication was successful or if the proxy is alive until the timeout period (\~25s).
If something isn't working as expected, check the VCS agent logs to see if the requests are being received
### Configure Webhook Integration
This section outlines the steps required to configure webhook integration for your VCS. Follow the instructions to set up the webhook and ensure it works with your system.
1. When you [Create VCS connection](/guides/admin-guide/templates/self-hosted-vcs/#create-vcs-connection) you will find the **Webhook Settings** button.
1.
5. Click "Save Connection"
**Forward requests to this VCS Agent**
The intention behind forwarding requests refers to all the requests the platform needs to support the features mentioned above. It does not refer to where the deployment actually runs; it will continue to run based on the project to which it is assigned.
### Configure VCS agent (Proxy)
Running a proxy can be achieved in two ways; as part of the agent's Kubernetes helm chart deployment or as a standalone Docker instance.
#### Agent's Kubernetes Helm Chart
1. The [installation](/guides/admin-guide/self-hosted-kubernetes-agent/self-hosted-kubernetes-agent#installation) is included as part of the agent's Kubernetes Helm chart deployment.
2. By default, the proxy runs when the agent is installed without any special configuration.
3. Proxy Configuration: Configure it in the [values.yml](/guides/admin-guide/self-hosted-kubernetes-agent/custom-optional-configuration) file
1. ```yaml theme={null}
agentProxy:
install: true # default true
replicas: 1 # how many replicas of the agent proxy to use. Default is 1
maxConcurrentRequests: 500 # how many concurrent requests each pod should handle. Default is 500
limits: # k8s (cpu and memory) limits. Example values: 250m and 500Mi (not set by default)
cpu: 250m
memory: 500Mi
bitbucketServerCredentialsEncoded: base64= # Base64 Bitbucket server credentials in the format `username:token (using a Personal Access token)
gitlabEnterpriseCredentialsEncoded: base64= # Base64 Gitlab Enterprise credentials in the form of an Access token
githubEnterpriseAppId: 1 # For more details, check out /guides/admin-guide/templates/github-enterprise-integration
githubEnterpriseAppInstallationId: 1
githubEnterpriseAppPrivateKeyEncoded: "base64=="
```
Refer to the Self Hosted Kubernetes Agent [specifications](/guides/admin-guide/self-hosted-kubernetes-agent/custom-optional-configuration) for additional configuration details.
#### Standalone VCS Agent Docker Instance
1. Run the VCS agent Docker image with the following command:
```shell theme={null}
docker run --env-file ~/path/to/env0.env ghcr.io/env0/vcs-agent:latest
```
2. For more details, see Standalone Docker Agent - [Running a VCS Agent](/guides/admin-guide/self-hosted-kubernetes-agent/standalone-docker-agent/#running-a-vcs-agent-for-on-prem--self-hosted-vcs).
**env zero communication with VCS Agent**
The communication is one-way: the VCS agent connects to the env zero platform. This means that when the env zero platform forwards a request to the VCS agent, we cannot immediately determine if the communication was successful or if the proxy is alive until the timeout period (\~25s).
If something isn't working as expected, check the VCS agent logs to see if the requests are being received
### Configure Webhook Integration
This section outlines the steps required to configure webhook integration for your VCS. Follow the instructions to set up the webhook and ensure it works with your system.
1. When you [Create VCS connection](/guides/admin-guide/templates/self-hosted-vcs/#create-vcs-connection) you will find the **Webhook Settings** button.
1.
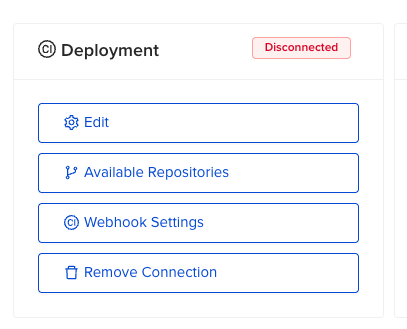 2. At the bottom of the window, you will see this section. From here, you need to obtain the **webhook URL** and **webhook secret**.
3. Configure Webhook Integration per Self-Hosted VCS:
1. [Github Enterprise](/guides/admin-guide/templates/github-enterprise-integration)
2. [Bitbucket Server](/guides/admin-guide/templates/bitbucket-server-integration)
3. [Gitlab Enterprise](/guides/admin-guide/templates/gitlab-enterprise-integration)
**Please ensure that only one entry is created for Webhook Integration. Creating multiple entries may result in duplicate events and cause multiple deployments for the same change.**
## Next steps
* [Self-Hosted Kubernetes Agent](/guides/admin-guide/self-hosted-kubernetes-agent/self-hosted-kubernetes-agent) - Deploy the agent required for self-hosted VCS connectivity.
* [Template Overview](/guides/admin-guide/templates) - Create templates that use the self-hosted VCS connection.
* [Plan And Apply via PR Comments](/guides/admin-guide/environments/plan-and-apply-from-pr-comments) - Use PR comment commands with self-hosted VCS providers.
2. At the bottom of the window, you will see this section. From here, you need to obtain the **webhook URL** and **webhook secret**.
3. Configure Webhook Integration per Self-Hosted VCS:
1. [Github Enterprise](/guides/admin-guide/templates/github-enterprise-integration)
2. [Bitbucket Server](/guides/admin-guide/templates/bitbucket-server-integration)
3. [Gitlab Enterprise](/guides/admin-guide/templates/gitlab-enterprise-integration)
**Please ensure that only one entry is created for Webhook Integration. Creating multiple entries may result in duplicate events and cause multiple deployments for the same change.**
## Next steps
* [Self-Hosted Kubernetes Agent](/guides/admin-guide/self-hosted-kubernetes-agent/self-hosted-kubernetes-agent) - Deploy the agent required for self-hosted VCS connectivity.
* [Template Overview](/guides/admin-guide/templates) - Create templates that use the self-hosted VCS connection.
* [Plan And Apply via PR Comments](/guides/admin-guide/environments/plan-and-apply-from-pr-comments) - Use PR comment commands with self-hosted VCS providers.