> ## Documentation Index
> Fetch the complete documentation index at: https://docs.envzero.com/llms.txt
> Use this file to discover all available pages before exploring further.
# Configure AWS Costs
> Set up AWS cost monitoring in env zero by creating an IAM role with Cost Explorer API access, enabling cost allocation tags, and registering the Role ARN.
env zero will assume an AWS IAM Role in your account to query AWS's billing API.\
[Read more about cross account role delegation](https://docs.aws.amazon.com/IAM/latest/UserGuide/tutorial_cross-account-with-roles.html).
To begin, log in to your AWS Console, and select the Identity and Access Management (IAM) service.
## Create an AWS IAM Policy
1. Click on **Policies** -> **Create Policy**
2. Select the **Cost Explorer** Service
3. Select the `GetCostAndUsage` Action
4. Choose a name for your policy and save it.
## Create an AWS IAM Role
1. Click on **Roles** -> **Create Role**
2. Under **type of trusted entity** select `Another AWS Account`
3. Under **Account ID** enter `913128560467`
4. Select `**Require external ID**`
5. Enter an External ID. The value **Must** be equal to your organization ID.
6. Click **Next:Permissions**
7. Select the policy you created in step 2.
8. Click **Next:Tags**
9. Click **Next:Review**
10. Enter a name for the role, and click **Create Role**
11. Click on the Role you just created - We will need the `Role ARN` in subsequent steps.
## Adding your Cost Role via IaC
```yaml CloudFormation (yaml) theme={null}
AWSTemplateFormatVersion: '2010-09-09'
Parameters:
RoleName:
Type: String
Default: "env0-cost-role"
ExternalId:
Type: String
Default: replace-with-your-org-id
Resources:
CostAssumeRole:
Type: "AWS::IAM::Role"
Properties:
Path: "/"
MaxSessionDuration: 3600
RoleName: !Ref RoleName
Description: "Used by env zero to provide cost-monitoring features."
AssumeRolePolicyDocument:
Version: "2012-10-17"
Statement:
- Condition:
StringEquals:
sts:ExternalId: !Ref ExternalId
Action: "sts:AssumeRole"
Effect: "Allow"
Principal:
AWS: "arn:aws:iam::913128560467:root"
CostPolicy:
Type: "AWS::IAM::ManagedPolicy"
DependsOn: "CostAssumeRole"
Properties:
ManagedPolicyName:
!Join
- ""
- - !Ref RoleName
- "-policy"
Path: "/"
Description: "Used by env zero to provide cost-monitoring features."
PolicyDocument:
Version: "2012-10-17"
Statement:
- Resource: "*"
Action: "ce:GetCostAndUsage"
Effect: "Allow"
Roles:
- !Ref RoleName
Outputs:
ExternalId:
Value: !Ref ExternalId
Description: "ExternalID for Env0"
AssumeRoleArn:
Value: !GetAtt CostAssumeRole.Arn
```
```hcl OpenTofu/Terraform (hcl) theme={null}
terraform {
required_providers {
aws = {
source = "hashicorp/aws"
version = "~> 5.49"
}
env0 = {
source = "env0/env0"
version = ">= 1.30"
}
}
}
# provider "env0" {
# # env0 Provider expects to find the environment variables defined.
# # to create an API key see: /api-keys
# # ENV0_API_KEY
# # ENV0_API_SECRET
# # or using tf provider variables
# # api_key = ""
# # api_secret = ""
# }
provider "aws" {
region = var.region
}
### VARIABLES
variable "region" {
type = string
default = "us-east-1"
}
variable "assume_role_name" {
type = string
default = "env0-cost-role"
description = "name used for both env0 and AWS"
}
variable "organization_id" {
type = string
description = "env0 org id found under Organization > Settings"
}
### RESOURCES
resource "aws_iam_role" "env0_cost_role" {
name = var.assume_role_name
max_session_duration = 3600 # env0 requirement, 5 hours for SaaS
# 913128560467 is env0's AWS Account ID
# see: /guides/getting-started/connect-your-cloud-account/#using-aws-assume-role
assume_role_policy = jsonencode({
"Version" : "2012-10-17",
"Statement" : [
{
"Effect" : "Allow",
"Principal" : {
"AWS" : "arn:aws:iam::913128560467:root"
},
"Action" : "sts:AssumeRole",
"Condition" : {
"StringEquals" : {
"sts:ExternalId" : "${var.organization_id}"
}
}
}
]
})
tags = {
note = "Created through env0 Bootstrap"
purpose = "Allow env0 Cost Management features"
}
}
resource "aws_iam_role_policy" "test_policy" {
name = "${var.assume_role_name}-cost-policy"
role = aws_iam_role.env0_cost_role.id
# Terraform's "jsonencode" function converts a
# Terraform expression result to valid JSON syntax.
policy = jsonencode({
Version = "2012-10-17"
Statement = [
{
Resource = "*"
Action = "ce:GetCostAndUsage"
Effect = "Allow"
},
]
})
}
# resource "env0_aws_cost_credentials" "aws_cost_credentials" {
# name = aws_iam_role.env0_cost_role.arn
# arn = aws_iam_role.env0_cost_role.arn
# duration = 3600
# }
output "role_arn" {
value = aws_iam_role.env0_cost_role.arn
}
```
## Enable User Defined Cost Allocation Tags
1. Add the Tags called `env0_environment_id` and `env0_project_id` to some resource in your AWS account - **Make sure** that you add those tags to a resource that has some cost to it, for example an EC2 instance.
2. Go to the "Billing" Service (**Billing & Cost Management**). You'll need to log into to the parent account, if you are using sub-accounts.
3. Under the left side menu, click **Cost allocation tags**.
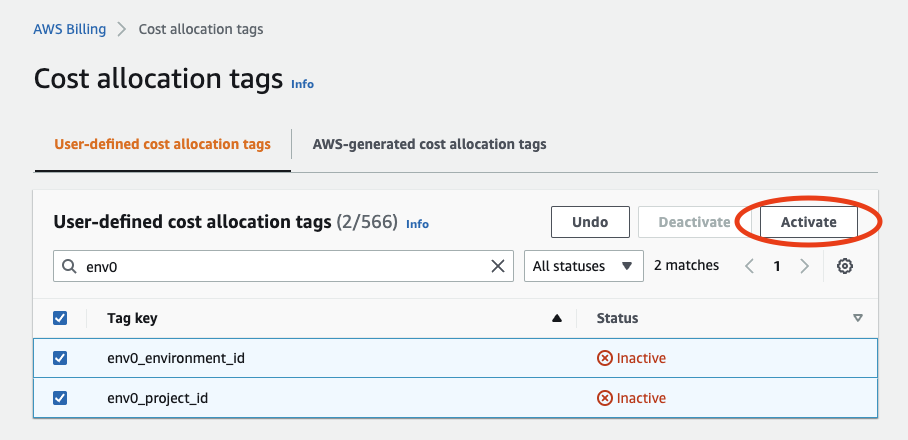
4. Under the **User-Defined Cost Allocation Tags** section, check the checkboxes for the tag-keys `env0_environment_id` and `env0_project_id`. Pay attention that those tags might be available in Cost Allocation Tags only after a few days, usually it's 24 hours but we've seen cases where it took a week for them to show up.
5. Click **Activate**
 Note
After this step, it can take up to 24 hours to see actual cost values in your environments.
## Enable Hourly and Resource Level Data
1. Go to the "Billing" Service (**Billing & Cost Management**). You'll need to log into to the parent account, if you are using sub-accounts.
2. Under the left side menu, click **Cost Explorer**.
3. Click on the **Launch Cost Explorer** button.
4. In the **Cost Explorer** page on the left side menu click on **Preferences**.
5. Under the **Hourly and Resource Level Data** enable the **Hourly and Resource Level Data** checkbox and save the changes.
## Add Credentials to your Organization
1. Under your **Organization Settings**, Select the **Credentials** tab
2. Under **Cost Credentials**, click **Add Credential**
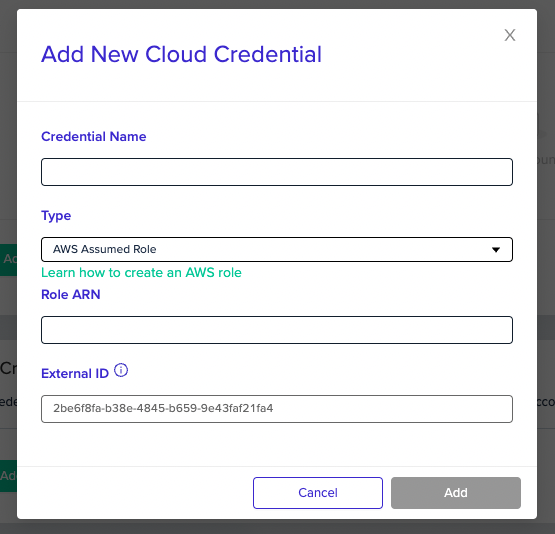
3. Select the **AWS Assumed Role** type, and enter the `Role ARN` from the previous step. The External ID cannot be edited.
4. Click **Add**
5. Re-run the environments to apply the necessary tags.
Drift after re-running environments
Note that enabling costing introduces drift as new tags will be injected into your resources
Note
After this step, it can take up to 24 hours to see actual cost values in your environments.
## Enable Hourly and Resource Level Data
1. Go to the "Billing" Service (**Billing & Cost Management**). You'll need to log into to the parent account, if you are using sub-accounts.
2. Under the left side menu, click **Cost Explorer**.
3. Click on the **Launch Cost Explorer** button.
4. In the **Cost Explorer** page on the left side menu click on **Preferences**.
5. Under the **Hourly and Resource Level Data** enable the **Hourly and Resource Level Data** checkbox and save the changes.
## Add Credentials to your Organization
1. Under your **Organization Settings**, Select the **Credentials** tab
2. Under **Cost Credentials**, click **Add Credential**
3. Select the **AWS Assumed Role** type, and enter the `Role ARN` from the previous step. The External ID cannot be edited.
4. Click **Add**
5. Re-run the environments to apply the necessary tags.
Drift after re-running environments
Note that enabling costing introduces drift as new tags will be injected into your resources
 ## Enable cost monitoring
1. Go to the\*\* Project Settings\*\* of the desired project.
2. Select the **Credentials** tab.
3. Check the appropriate cloud provider checkbox, and select the credential you created in the steps above.
4. Click **Save**.
Data visibility
Please note that after the configuration of cost monitoring is complete, a redeploy to the environments is needed, and once redeployed it can take 24-48 hours for data to show, depending on the cloud provider's cost exploration capabilities.
## Next steps
* [Set Cost Monitoring](/guides/cost-monitoring/cost-monitoring) - Enable cost tracking after adding credentials.
* [Set Budget Notifications](/guides/cost-monitoring/budget-notifications) - Get alerted when project spending crosses a limit.
* [Cloud Analyst](/guides/cloud-analyst/cloud-analyst) - Explore AI-powered cost insights across your organization.
## Enable cost monitoring
1. Go to the\*\* Project Settings\*\* of the desired project.
2. Select the **Credentials** tab.
3. Check the appropriate cloud provider checkbox, and select the credential you created in the steps above.
4. Click **Save**.
Data visibility
Please note that after the configuration of cost monitoring is complete, a redeploy to the environments is needed, and once redeployed it can take 24-48 hours for data to show, depending on the cloud provider's cost exploration capabilities.
## Next steps
* [Set Cost Monitoring](/guides/cost-monitoring/cost-monitoring) - Enable cost tracking after adding credentials.
* [Set Budget Notifications](/guides/cost-monitoring/budget-notifications) - Get alerted when project spending crosses a limit.
* [Cloud Analyst](/guides/cloud-analyst/cloud-analyst) - Explore AI-powered cost insights across your organization.