> ## Documentation Index
> Fetch the complete documentation index at: https://docs.envzero.com/llms.txt
> Use this file to discover all available pages before exploring further.
# Connect Your Cloud Account
> Grant env zero permissions to manage resources in AWS, Azure, GCP, OCI, and Kubernetes using IAM roles, service principals, OIDC, or kubeconfig credentials.
This step assumes you have already [connected your VCS](/guides/getting-started/connect-your-vcs).
env zero applies your infrastructure code to create resources in your own cloud account. It requires only the necessary permissions to manage your cloud resources on your behalf.
Jump to your cloud provider:
* [AWS](#amazon-web-services-aws)
* [GCP](#google-cloud-gcp)
* [Azure](#azure)
* [OCI](#oracle-cloud-infrastructure-oci)
* [Kubernetes](#kubernetes)
## Credentials Management
When creating a credential in env zero, it can be assigned to one of two scopes: `Organization` or `Project`.
* **Organization Scope**: When a credential is created via the organization credentials page (Organization Settings > Credentials), it is assigned to the `Organization` scope. This makes it available to all projects within the organization.
* **Project Scope**: When a credential is created via the project credentials page (Project Settings > Credentials), it is assigned to the `Project` scope. This makes it available to that specific project and any of its sub-projects.
All credentials, regardless of scope, are visible on the organization credentials page. To create or update credentials in a specific scope, you must have the `MANAGE_CREDENTIALS` permission at that scope level (organization or project). By default, both `Project Admin` and `Organization Admin` roles include this permission.\
For example, to create or edit credentials in the project "My Project," you need the `MANAGE_CREDENTIALS` permission for that project.
### Use case example
A common reason to scope credentials is to separate access between environments. For instance, if you have distinct development and production projects, you can ensure that users in the development project do not have access to production credentials.
## Amazon Web Services (AWS)
env zero offers three ways for you to connect to your AWS account:
1. Using AWS Assume Role
2. Using IAM user credentials
3. Using [OIDC](/guides/integrations/oidc-integrations/oidc-with-aws)
**Choosing an auth method:** Assume Role is recommended for most teams. It does not create long-lived credentials in env zero. Use IAM user credentials only if cross-account role assumption is unavailable in your setup. Use OIDC to eliminate stored credentials entirely.
### Using AWS Assume Role
This role will be assumed by env zero during a deployment.\
It will require all permissions required including `GetAccessKeyInfo`.
#### Create an AWS IAM Role
1. Click on Roles, then click on Create Role
2. Under type of trusted entity, select AWS Account
3. Under An AWS account ID, select 'An AWS account' and enter `913128560467`. This is env zero's AWS Account ID. If you have a self-hosted [agent](/guides/getting-started/glossary#agent), enter the AWS account ID where your agent is installed instead.
4. Select Require External ID
5. Enter an External ID. The value must be equal to your Organization ID. Find it under [Organization Settings](/guides/admin-guide/organizations/#finding-my-organization-id)
6. Click Next:Permissions
7. Select AdministratorAccess or whatever policies are required by your IaC
8. Click Next:Review
9. Enter a name for the role, and click Create Role
10. Click on the role you created. Copy the `Role ARN` from the role summary page. You will need it in the next step.
**Assume Role Duration**
To edit the duration of the Assume Role, go to the Created Role screen and locate Maximum Session Duration. Click Edit and select your relevant duration.
When you create the credentials in env zero, select the correct duration. It must be equal to or less than the Maximum Session Duration configured on the IAM role in AWS.
#### Add your Role ARN and External ID configuration to env zero (via CloudFormation)
You can use the following CloudFormation Template or Terraform HCL to create the AssumeRole
```yaml CloudFormation(yaml) theme={null}
AWSTemplateFormatVersion: '2010-09-09'
Parameters:
ExternalId:
Type: String
Default: external-id
SessionDuration:
Type: Number
Default: 3600
Resources:
AssumeRole:
Type: AWS::IAM::Role
Properties:
RoleName: Env0-AssumeRole
Description: |
Used by env zero to automate the deployment of Infrastructure from a Version Control System
AssumeRolePolicyDocument: !Sub |
{"Version": "2012-10-17",
"Statement": [
{
"Effect": "Allow",
"Action": "sts:AssumeRole",
"Principal": {
"AWS": "913128560467"
},
"Condition": {
"StringEquals": {
"sts:ExternalId": "${ExternalId}"
}
}
}
]
}
ManagedPolicyArns:
- arn:aws:iam::aws:policy/AdministratorAccess
MaxSessionDuration: !Ref SessionDuration
Tags:
- Key: Owner
Value: env zero
Outputs:
ExternalId:
Value: !Ref ExternalId
Description: "ExternalID for env zero"
AssumeRoleArn:
Value: !GetAtt AssumeRole.Arn
```
```hcl Terraform (HCL) theme={null}
terraform {
required_providers {
aws = {
source = "hashicorp/aws"
version = "~> 5.0" # Check https://registry.terraform.io/providers/hashicorp/aws for the latest version
}
env0 = {
source = "env0/env0"
version = ">= 1.30"
}
}
}
provider "env0" {
# env zero Provider expects to find the environment variables defined.
# to create an API key see: /api-keys
# ENV0_API_KEY
# ENV0_API_SECRET
# or using tf provider variables
# api_key = ""
# api_secret = ""
}
provider "aws" {
region = var.region
}
### VARIABLES
variable "region" {
type = string
default = "us-east-1"
}
variable "assume_role_name" {
type = string
default = "env0-deployer-role"
description = "name used for both env zero and AWS"
}
variable "managed_policy_arns" {
type = list(string)
default = ["arn:aws:iam::aws:policy/AdministratorAccess", ]
description = "list of policy arns to assign to env zero's deployer"
}
variable "organization_id" {
type = string
description = "env zero org id found under Organization > Settings"
}
### RESOURCES
resource "aws_iam_role" "env0_deployer_role" {
name = var.assume_role_name
max_session_duration = 18000 # env zero requirement, 5 hours for SaaS
# Change to your policy
managed_policy_arns = var.managed_policy_arns
# 913128560467 is env0's AWS Account ID
# see: /guides/getting-started/connect-your-cloud-account/#using-aws-assume-role
assume_role_policy = jsonencode({
"Version" : "2012-10-17",
"Statement" : [
{
"Effect" : "Allow",
"Principal" : {
"AWS" : "arn:aws:iam::913128560467:root"
},
"Action" : "sts:AssumeRole",
"Condition" : {
"StringEquals" : {
"sts:ExternalId" : "${var.organization_id}"
}
}
}
]
})
tags = {
note = "Created through env0 Bootstrap"
}
}
# optional to manage your env0 resources using env0's terraform provider
resource "env0_aws_credentials" "credentials" {
name = aws_iam_role.env0_deployer_role.arn #easier to track in the UI which role exactly is being used
arn = aws_iam_role.env0_deployer_role.arn
}
output "role_arn" {
value = aws_iam_role.env0_deployer_role.arn
}
```
```bash AWS CLI theme={null}
# Step 1 - Create the trust policy document (replace YOUR_ORGANIZATION_ID)
cat > trust-policy.json << 'EOF'
{
"Version": "2012-10-17",
"Statement": [{
"Effect": "Allow",
"Principal": { "AWS": "arn:aws:iam::913128560467:root" },
"Action": "sts:AssumeRole",
"Condition": {
"StringEquals": { "sts:ExternalId": "YOUR_ORGANIZATION_ID" }
}
}]
}
EOF
# Step 2 - Create the IAM role with a 5-hour max session
aws iam create-role \
--role-name Env0-AssumeRole \
--assume-role-policy-document file://trust-policy.json \
--max-session-duration 18000
# Step 3 - Attach permissions (adjust the policy ARN as needed)
aws iam attach-role-policy \
--role-name Env0-AssumeRole \
--policy-arn arn:aws:iam::aws:policy/AdministratorAccess
# Step 4 - Get the Role ARN to enter in env zero
aws iam get-role --role-name Env0-AssumeRole --query 'Role.Arn' --output text
```
If you used the CloudFormation template, run the following command to deploy the stack:
```shell theme={null}
aws cloudformation deploy \
--stack-name assume-role-env0 \
--template-file ./assume-role-env0.yml \
--capabilities CAPABILITY_NAMED_IAM \
--parameter-overrides ExternalId=YOUR_ORGANIZATION_ID SessionDuration=SESSION_DURATION
```
The `RoleArn` will be available in the Outputs tab of your CloudFormation stack.
For security reasons, the ExternalID is resolved on the backend to be your organization ID.
#### Add your Role ARN configuration to env0 (via Manual Configuration)
1. Go to the Settings page, and pick the Credentials tab
2. Under Deployment Credentials section, click + Add Credential
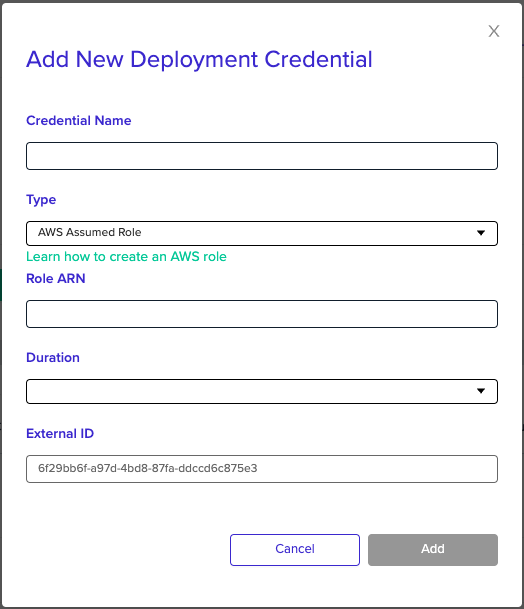
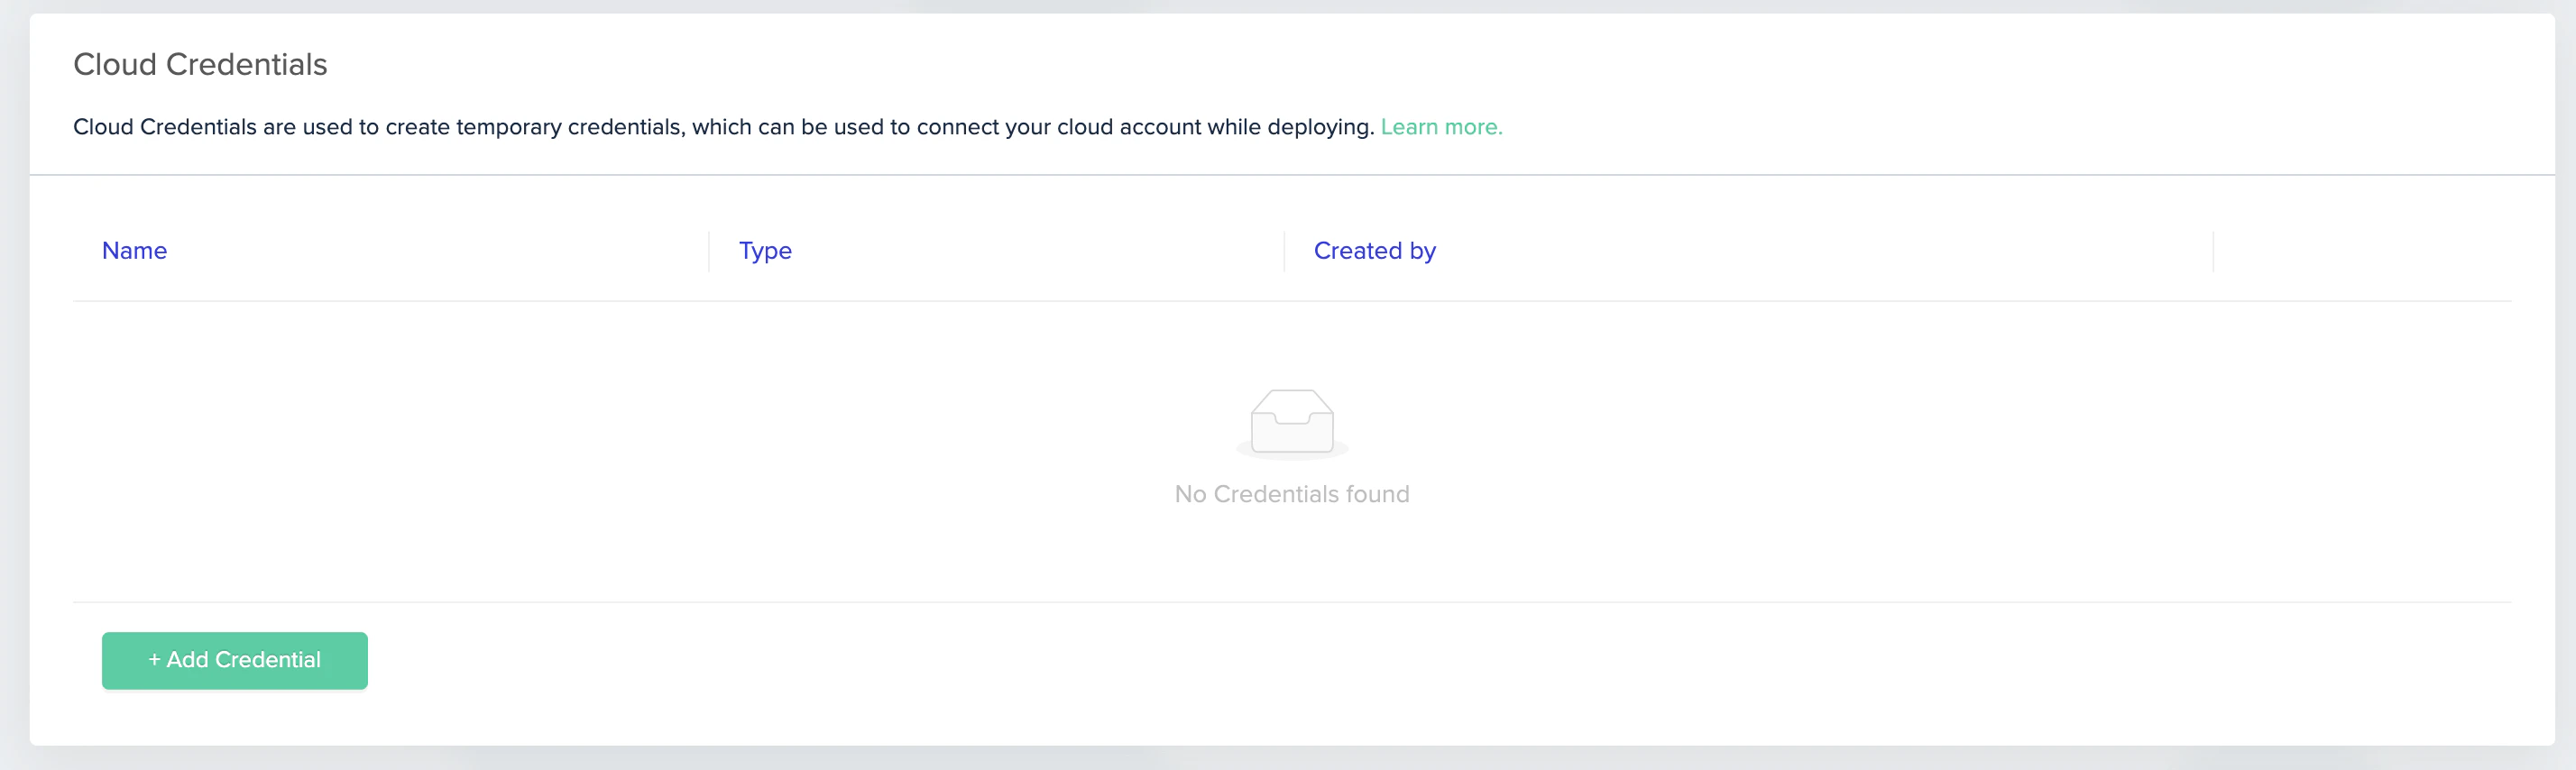 3. Enter a name for the new credential
4. Under Type, pick AWS Assumed Role
5. Under Role ARN, enter your role ARN
6. Your External ID is pre-filled with your env0 Organization ID
7. Choose the duration for the deployment's assumed role (make sure it is equal or less than the duration you set in AWS)
The External ID must match exactly what is in your AWS trust policy. A mismatch is the most common cause of "Access Denied" errors when env zero tries to assume the role.
8. Click Add
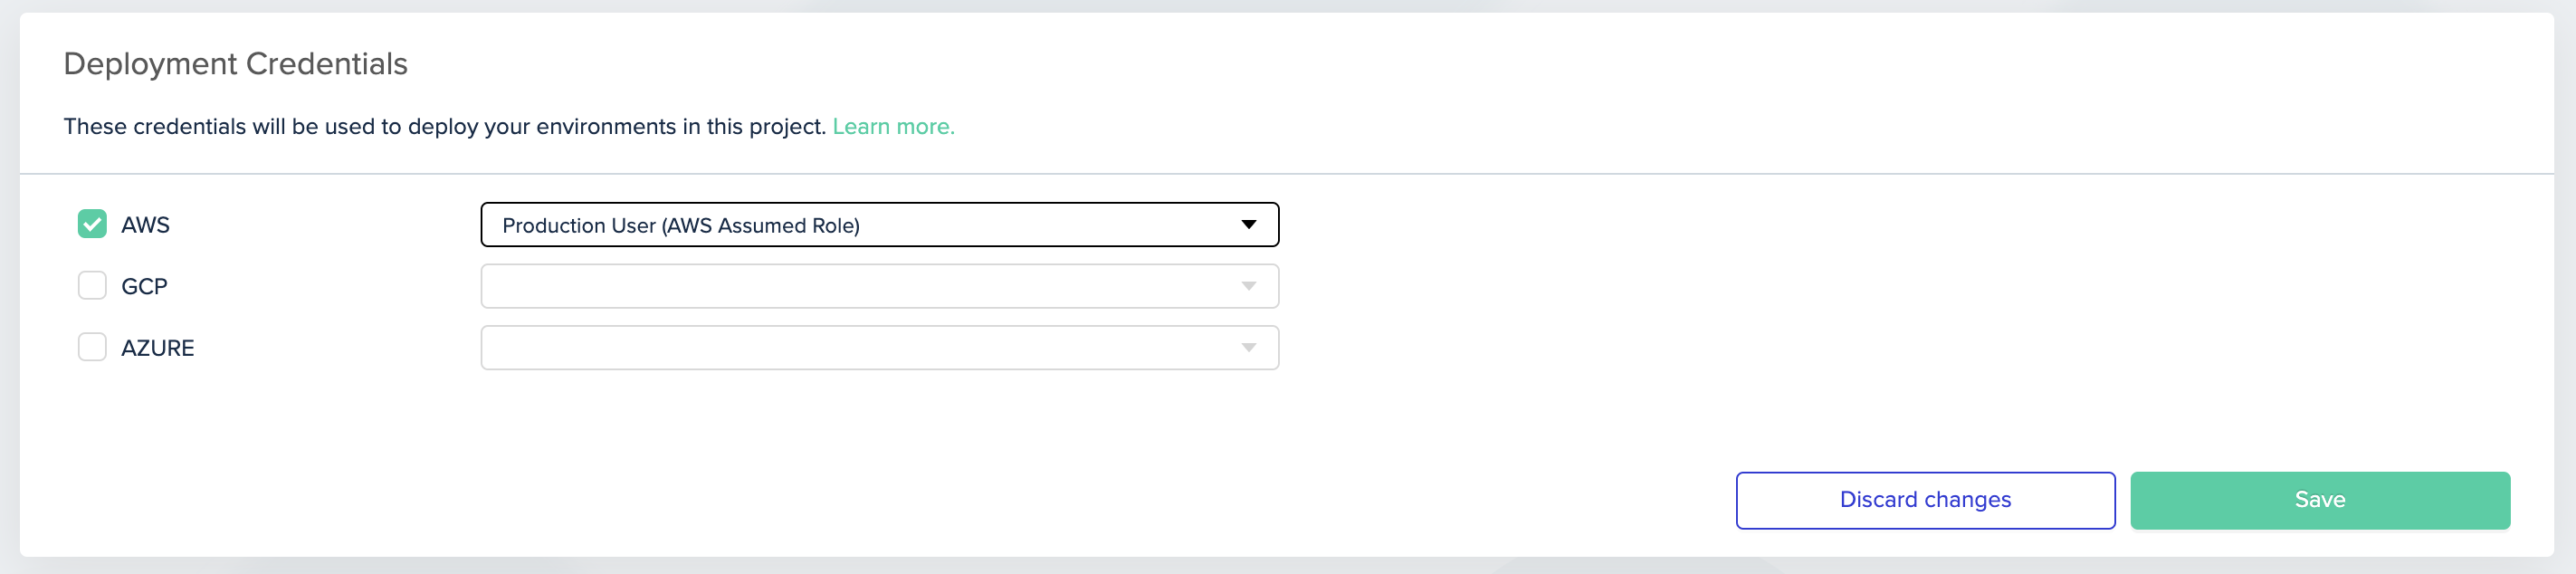
9. Go to the project for which you'd like to use this role, then click Project Settings and click Credentials
10. Pick the credential you would like to use in this project, this project, then click Add
3. Enter a name for the new credential
4. Under Type, pick AWS Assumed Role
5. Under Role ARN, enter your role ARN
6. Your External ID is pre-filled with your env0 Organization ID
7. Choose the duration for the deployment's assumed role (make sure it is equal or less than the duration you set in AWS)
The External ID must match exactly what is in your AWS trust policy. A mismatch is the most common cause of "Access Denied" errors when env zero tries to assume the role.
8. Click Add
9. Go to the project for which you'd like to use this role, then click Project Settings and click Credentials
10. Pick the credential you would like to use in this project, this project, then click Add
 **Change Assumed Role per Environment**
If you'd like to override the project's Assumed Role and use a different Assumed Role for a specific environment, set the following environment variables:
* A variable called `ENV0_AWS_ROLE_ARN`- set its value to be the role ARN
* A variable called `ENV0_AWS_ROLE_EXTERNAL_ID`- its value to your [Org ID](/guides/admin-guide/organizations/#finding-my-organization-id)
To customize the duration per environment, create a variable called`ENV0_AWS_ROLE_DURATION`, and set its value to the desired duration in seconds. AWS uses a default value of 3600s (1 hour), while env zero uses a default value of 18000s (5 hours).
### Using AWS user credentials
#### Create IAM Role & Permissions
1. To connect your AWS account, you will need to create an IAM user with programmatic access. See [this guide](https://docs.aws.amazon.com/IAM/latest/UserGuide/id_users_create.html) on how to do that. Make sure you save your **Access Key ID** and **Secret Access Key**.
2. You will need to grant this user the appropriate permissions to deploy the resources defined in your IaC code.
#### Add your credentials to env zero
1. Go to Settings and click the Credentials tab
2. Under Deployment Credentials, click + Add Credential
3. Enter a name for the new credential
4. Under Type, pick AWS Access Keys
5. Under Access Key ID, enter your Access Key ID
6. Under Secret Access Key, enter the value of your Secret Access Key
7. Click Add
**Secret Access Key in a Self-Hosted Agent**
If your organization is managed in a Kubernetes Self-Hosted Agent, you must reference an existing AWS, GCP or Azure secret manager variable instead of typing the actual Secret Access Key.
Read more [here](/guides/admin-guide/self-hosted-kubernetes-agent/self-hosted-kubernetes-agent#sensitive-secrets)
**Change Assumed Role per Environment**
If you'd like to override the project's Assumed Role and use a different Assumed Role for a specific environment, set the following environment variables:
* A variable called `ENV0_AWS_ROLE_ARN`- set its value to be the role ARN
* A variable called `ENV0_AWS_ROLE_EXTERNAL_ID`- its value to your [Org ID](/guides/admin-guide/organizations/#finding-my-organization-id)
To customize the duration per environment, create a variable called`ENV0_AWS_ROLE_DURATION`, and set its value to the desired duration in seconds. AWS uses a default value of 3600s (1 hour), while env zero uses a default value of 18000s (5 hours).
### Using AWS user credentials
#### Create IAM Role & Permissions
1. To connect your AWS account, you will need to create an IAM user with programmatic access. See [this guide](https://docs.aws.amazon.com/IAM/latest/UserGuide/id_users_create.html) on how to do that. Make sure you save your **Access Key ID** and **Secret Access Key**.
2. You will need to grant this user the appropriate permissions to deploy the resources defined in your IaC code.
#### Add your credentials to env zero
1. Go to Settings and click the Credentials tab
2. Under Deployment Credentials, click + Add Credential
3. Enter a name for the new credential
4. Under Type, pick AWS Access Keys
5. Under Access Key ID, enter your Access Key ID
6. Under Secret Access Key, enter the value of your Secret Access Key
7. Click Add
**Secret Access Key in a Self-Hosted Agent**
If your organization is managed in a Kubernetes Self-Hosted Agent, you must reference an existing AWS, GCP or Azure secret manager variable instead of typing the actual Secret Access Key.
Read more [here](/guides/admin-guide/self-hosted-kubernetes-agent/self-hosted-kubernetes-agent#sensitive-secrets)
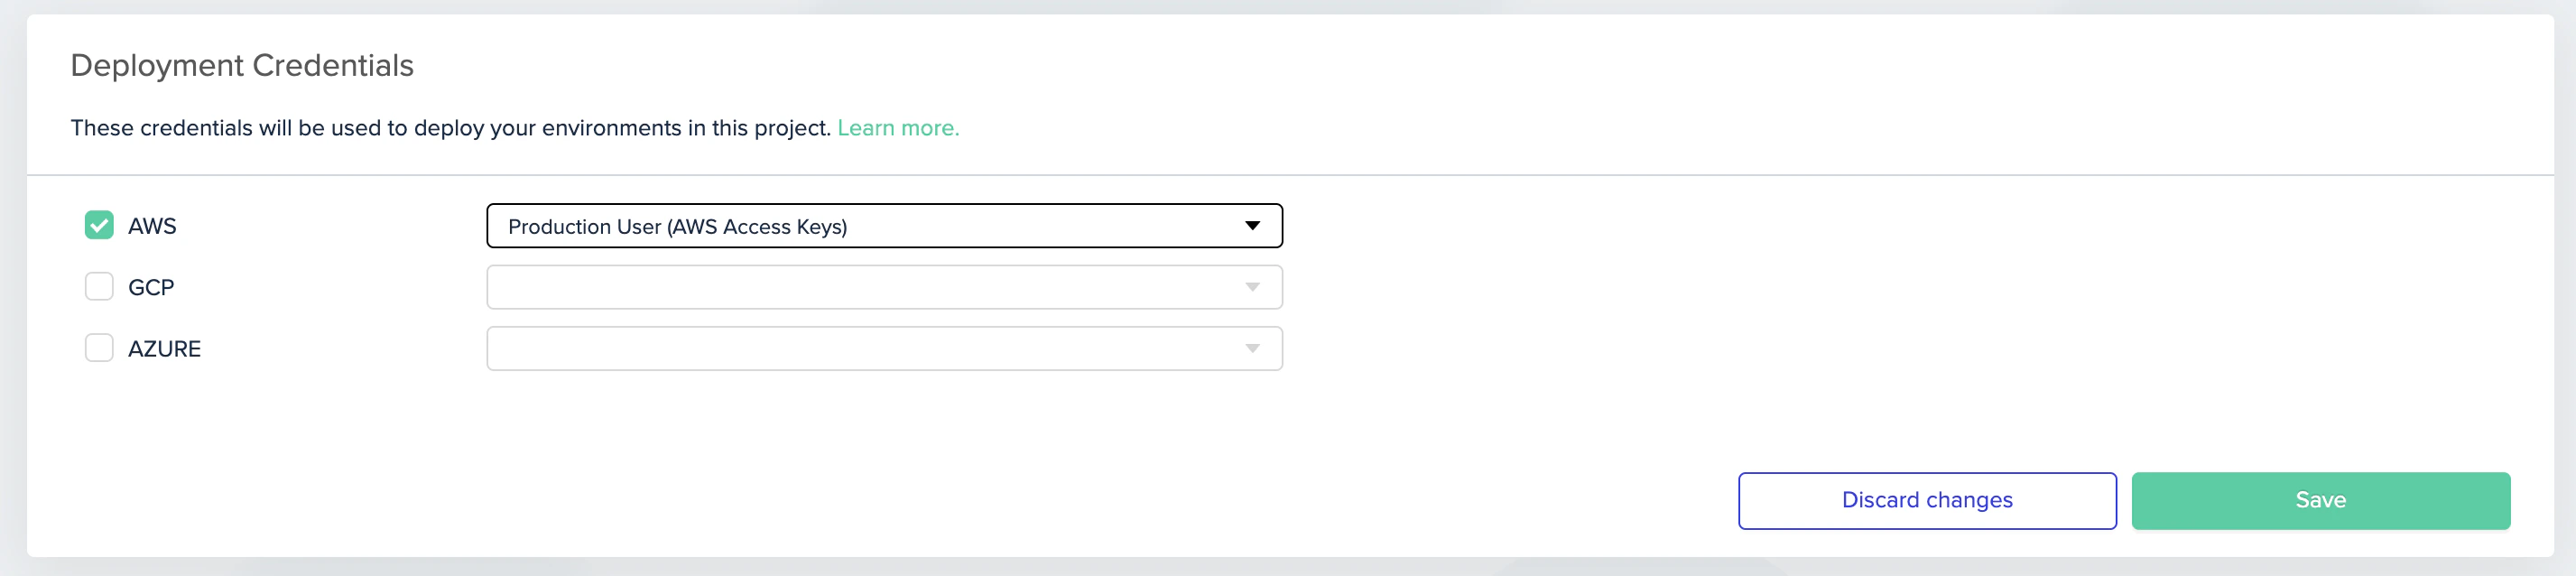
 8. Go to the project for which you'd like to use this role, then go to Project Settings and click Credentials
9. Pick the credential you would like to use in this project, and then click on Save
8. Go to the project for which you'd like to use this role, then go to Project Settings and click Credentials
9. Pick the credential you would like to use in this project, and then click on Save
 ## Google Cloud (GCP)
### Create a service account
To connect your GCP account, create a service account key. See the [Google Cloud documentation](https://cloud.google.com/iam/docs/service-accounts-create) on how to create a service account. Make sure to save the JSON key contents.
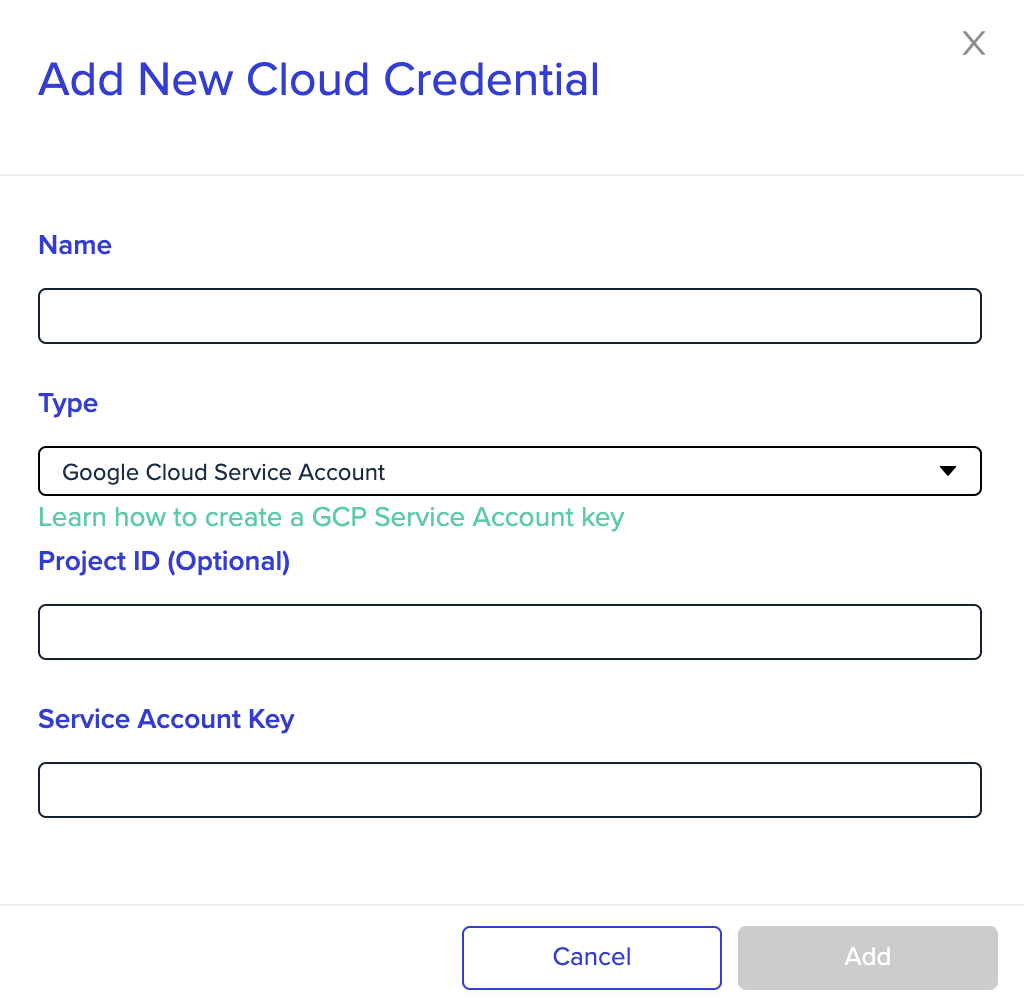
### Add your credentials to env zero
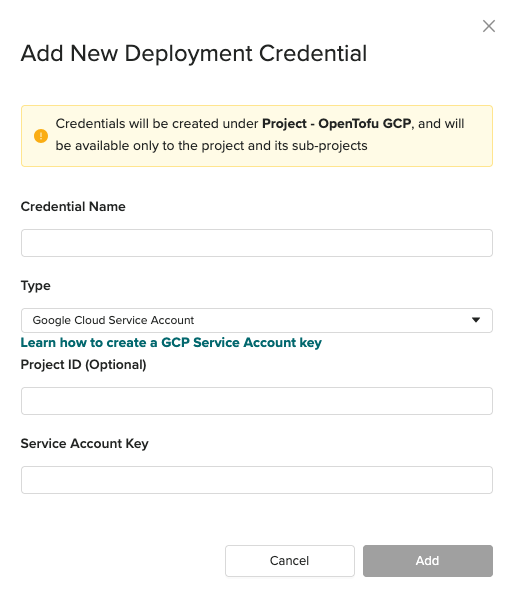
1. Go to the Settings page and click the Credentials tab
2. Under Deployment Credentials, click + Add Credential
3. Enter a name for the new credential.
4. Under Type, pick GCP Credentials
5. Under Project ID, enter your GCP project ID (optional)
6. Under **Service Account Key**, copy and paste the JSON key contents directly into the value of this variable
7. Click Add
Paste the complete JSON key file, including the opening `{` and closing `}`. A truncated or partial key will fail credential validation.
**Service Account Key in a Self-Hosted Agent**
If your organization is managed in a Kubernetes Self-Hosted Agent, you must reference an existing AWS, GCP, or Azure secret manager variable instead of typing the actual Service Account Key.
Read more [here](/guides/admin-guide/self-hosted-kubernetes-agent/self-hosted-kubernetes-agent#sensitive-secrets)
## Google Cloud (GCP)
### Create a service account
To connect your GCP account, create a service account key. See the [Google Cloud documentation](https://cloud.google.com/iam/docs/service-accounts-create) on how to create a service account. Make sure to save the JSON key contents.
### Add your credentials to env zero
1. Go to the Settings page and click the Credentials tab
2. Under Deployment Credentials, click + Add Credential
3. Enter a name for the new credential.
4. Under Type, pick GCP Credentials
5. Under Project ID, enter your GCP project ID (optional)
6. Under **Service Account Key**, copy and paste the JSON key contents directly into the value of this variable
7. Click Add
Paste the complete JSON key file, including the opening `{` and closing `}`. A truncated or partial key will fail credential validation.
**Service Account Key in a Self-Hosted Agent**
If your organization is managed in a Kubernetes Self-Hosted Agent, you must reference an existing AWS, GCP, or Azure secret manager variable instead of typing the actual Service Account Key.
Read more [here](/guides/admin-guide/self-hosted-kubernetes-agent/self-hosted-kubernetes-agent#sensitive-secrets)
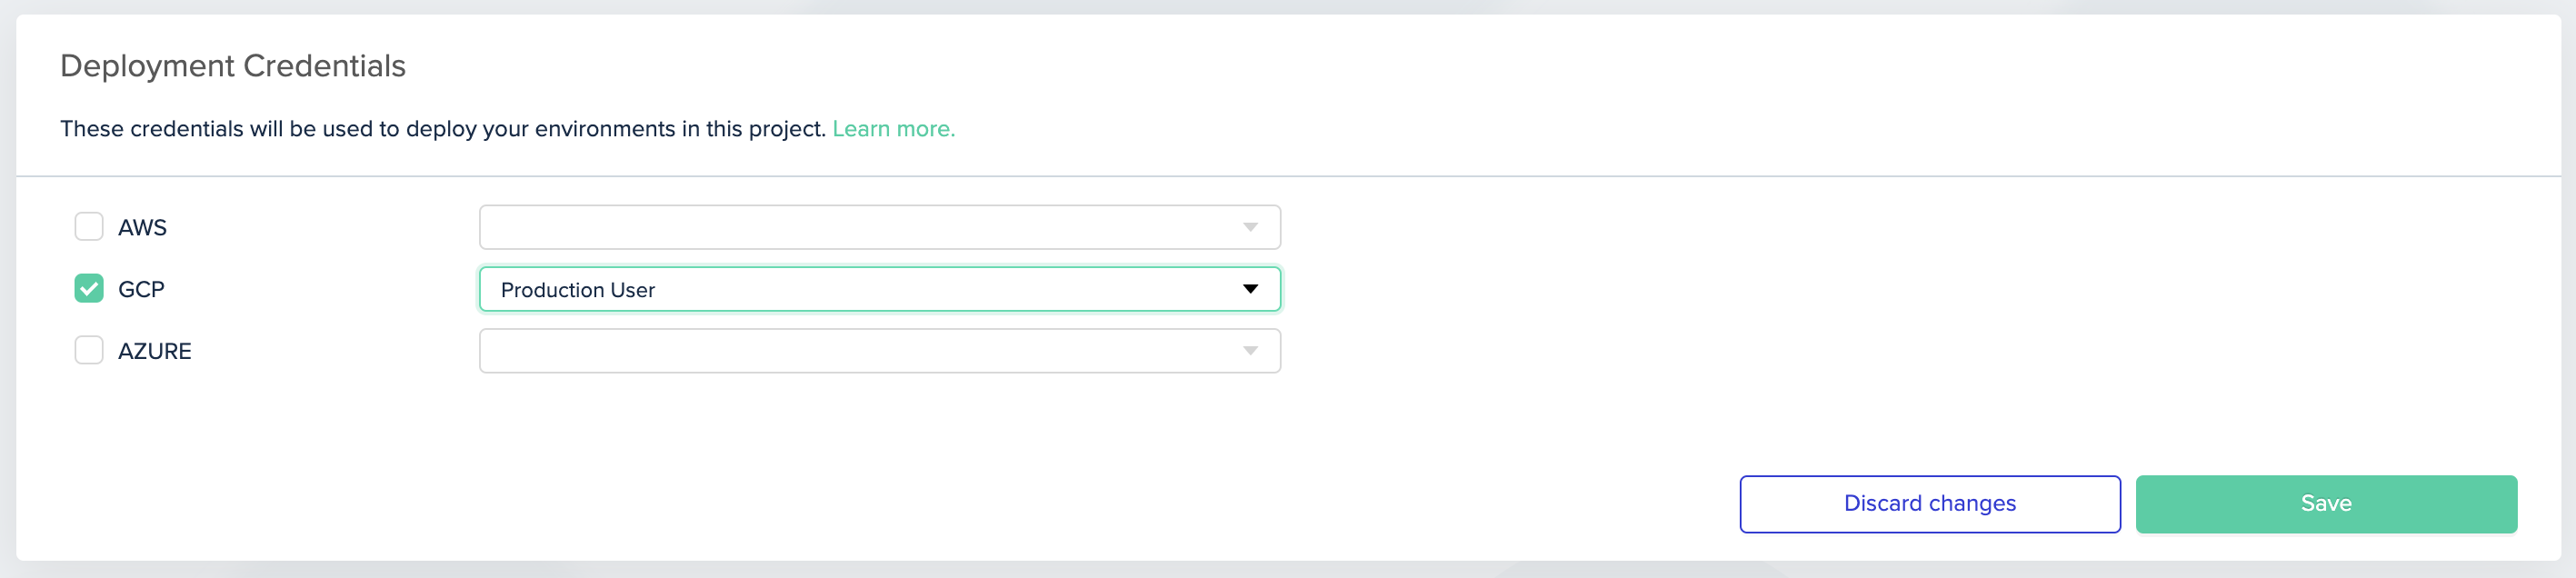
 8. Go to the project for which you'd like to use this role, and then go to Project Settings and click Credentials
9. Pick the credential you would like to use in this project, then click Save
8. Go to the project for which you'd like to use this role, and then go to Project Settings and click Credentials
9. Pick the credential you would like to use in this project, then click Save
 ### Using OIDC with GCP
See instructions [here](/guides/integrations/oidc-integrations/oidc-with-google-cloud-platform).
## Azure
### Create a service principal
To access resources, a **Service Principal** needs to be created in your Tenant.\
This is easiest to do via the AZ CLI.
1. First, make sure you are logged in:
```bash theme={null}
az login
```
Follow the instructions to login
2. Once logged in, your subscriptions will be returned:
```json5 theme={null}
[
{
"cloudName": "AzureCloud",
"id": "2d7e700a-8793-45ff-ba0a-9d92d15edf56", // this is your Subscription ID
"isDefault": "true",
"name": "Pay-As-You-Go",
"state": "Enabled",
"tenantId": "e522969-635a-4327-8807-7f7aac328e82",
"user": {
"name": "who@outlook.com",
"type": "user"
}
}
]
```
3. Next, set your active subscription:
```bash theme={null}
az account set --subscription="${id}"
```
4. Create a Service Principal for env zero to deploy your terraform stack:
```bash theme={null}
az ad sp create-for-rbac -n "${name-of-your-choice}"
```
This will return the metadata for your Service Principal:
```json5 theme={null}
{
"appId": "2dc2b1b3-11dd-4eb5-845-84fc-5bda87620cea", // this is your Client ID
"displayName": "who",
"name": "http://who",
"password": "ab735025-151e-4337-b154-b7833d6929a9", // this is your Client Secret
"tenant": "5c8c7547-dd3f-4750-a8d9-f2e04e6015ba" // this is your Tenant ID
}
```
Make sure the new Service Principal has the necessary permissions. [Learn how to assign a role in Azure.](https://learn.microsoft.com/en-us/azure/role-based-access-control/role-assignments-portal#step-6-select-assignment-type)
### Add your credentials to env zero
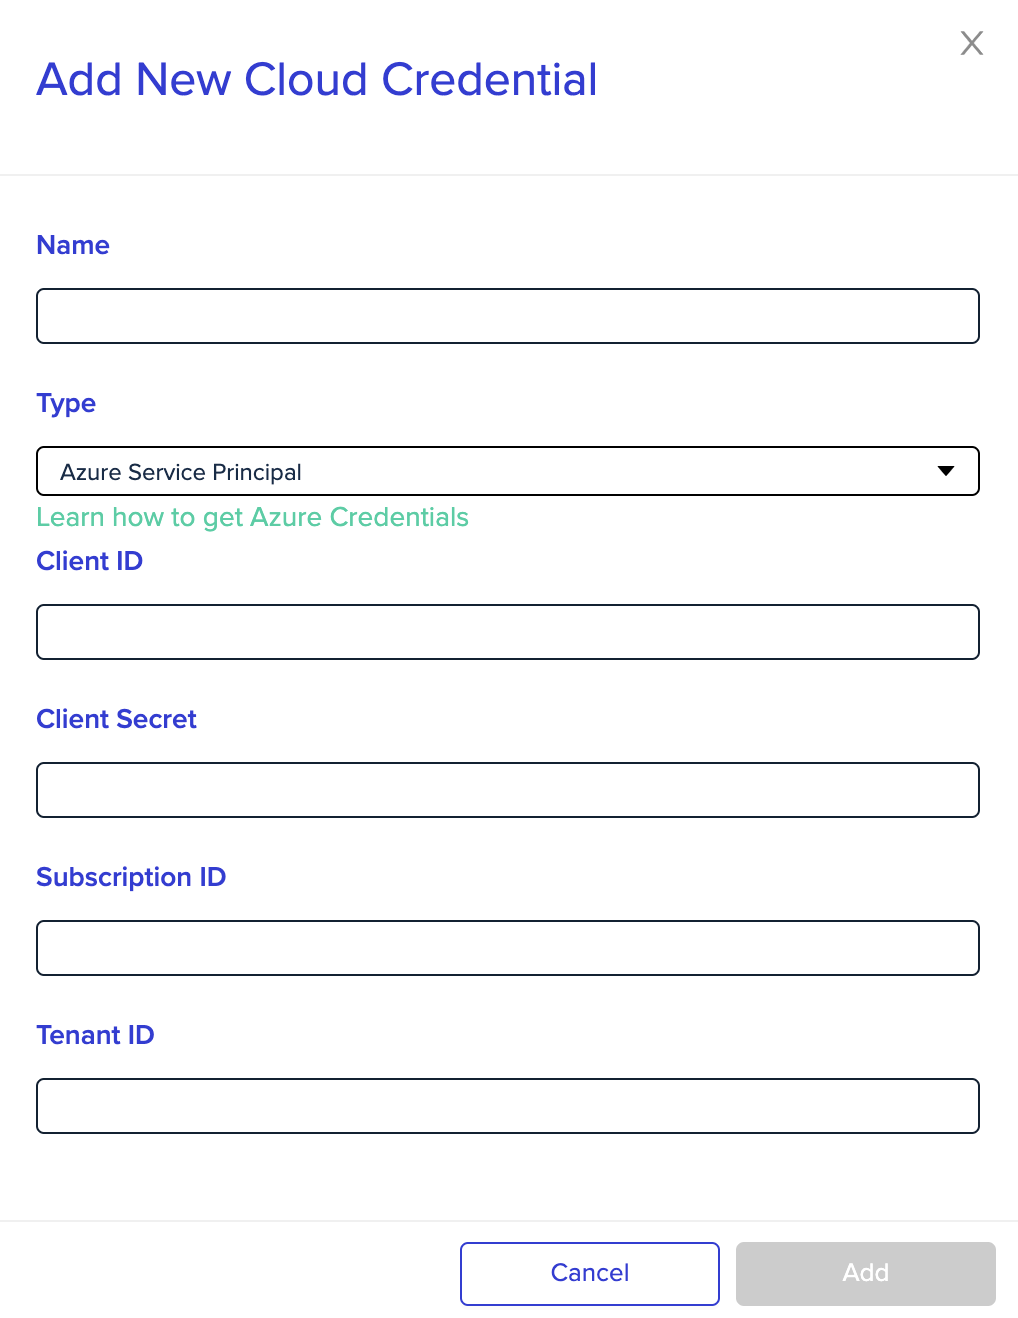
1. Go to the Settings page, and click on the Credentials tab
2. Under the Deployment Credentials section, click + Add Credential
3. Enter a name for the new credential
4. Under Type, pick Azure Credentials
5. Under Client ID, enter your service principal app ID
6. Under Client Secret, enter your service principal password
7. Under Subscription ID, enter your subscription ID
8. Under Tenant ID, enter your service principal tenant ID
9. Click Add
**Client Secret in a Self-Hosted Agent**
If your organization is managed in a Kubernetes Self-Hosted Agent, you must reference an existing AWS, GCP, or Azure secret manager variable instead of typing the actual secret Client Secret.
Read more [here](/guides/admin-guide/self-hosted-kubernetes-agent/self-hosted-kubernetes-agent#sensitive-secrets).
### Using OIDC with GCP
See instructions [here](/guides/integrations/oidc-integrations/oidc-with-google-cloud-platform).
## Azure
### Create a service principal
To access resources, a **Service Principal** needs to be created in your Tenant.\
This is easiest to do via the AZ CLI.
1. First, make sure you are logged in:
```bash theme={null}
az login
```
Follow the instructions to login
2. Once logged in, your subscriptions will be returned:
```json5 theme={null}
[
{
"cloudName": "AzureCloud",
"id": "2d7e700a-8793-45ff-ba0a-9d92d15edf56", // this is your Subscription ID
"isDefault": "true",
"name": "Pay-As-You-Go",
"state": "Enabled",
"tenantId": "e522969-635a-4327-8807-7f7aac328e82",
"user": {
"name": "who@outlook.com",
"type": "user"
}
}
]
```
3. Next, set your active subscription:
```bash theme={null}
az account set --subscription="${id}"
```
4. Create a Service Principal for env zero to deploy your terraform stack:
```bash theme={null}
az ad sp create-for-rbac -n "${name-of-your-choice}"
```
This will return the metadata for your Service Principal:
```json5 theme={null}
{
"appId": "2dc2b1b3-11dd-4eb5-845-84fc-5bda87620cea", // this is your Client ID
"displayName": "who",
"name": "http://who",
"password": "ab735025-151e-4337-b154-b7833d6929a9", // this is your Client Secret
"tenant": "5c8c7547-dd3f-4750-a8d9-f2e04e6015ba" // this is your Tenant ID
}
```
Make sure the new Service Principal has the necessary permissions. [Learn how to assign a role in Azure.](https://learn.microsoft.com/en-us/azure/role-based-access-control/role-assignments-portal#step-6-select-assignment-type)
### Add your credentials to env zero
1. Go to the Settings page, and click on the Credentials tab
2. Under the Deployment Credentials section, click + Add Credential
3. Enter a name for the new credential
4. Under Type, pick Azure Credentials
5. Under Client ID, enter your service principal app ID
6. Under Client Secret, enter your service principal password
7. Under Subscription ID, enter your subscription ID
8. Under Tenant ID, enter your service principal tenant ID
9. Click Add
**Client Secret in a Self-Hosted Agent**
If your organization is managed in a Kubernetes Self-Hosted Agent, you must reference an existing AWS, GCP, or Azure secret manager variable instead of typing the actual secret Client Secret.
Read more [here](/guides/admin-guide/self-hosted-kubernetes-agent/self-hosted-kubernetes-agent#sensitive-secrets).
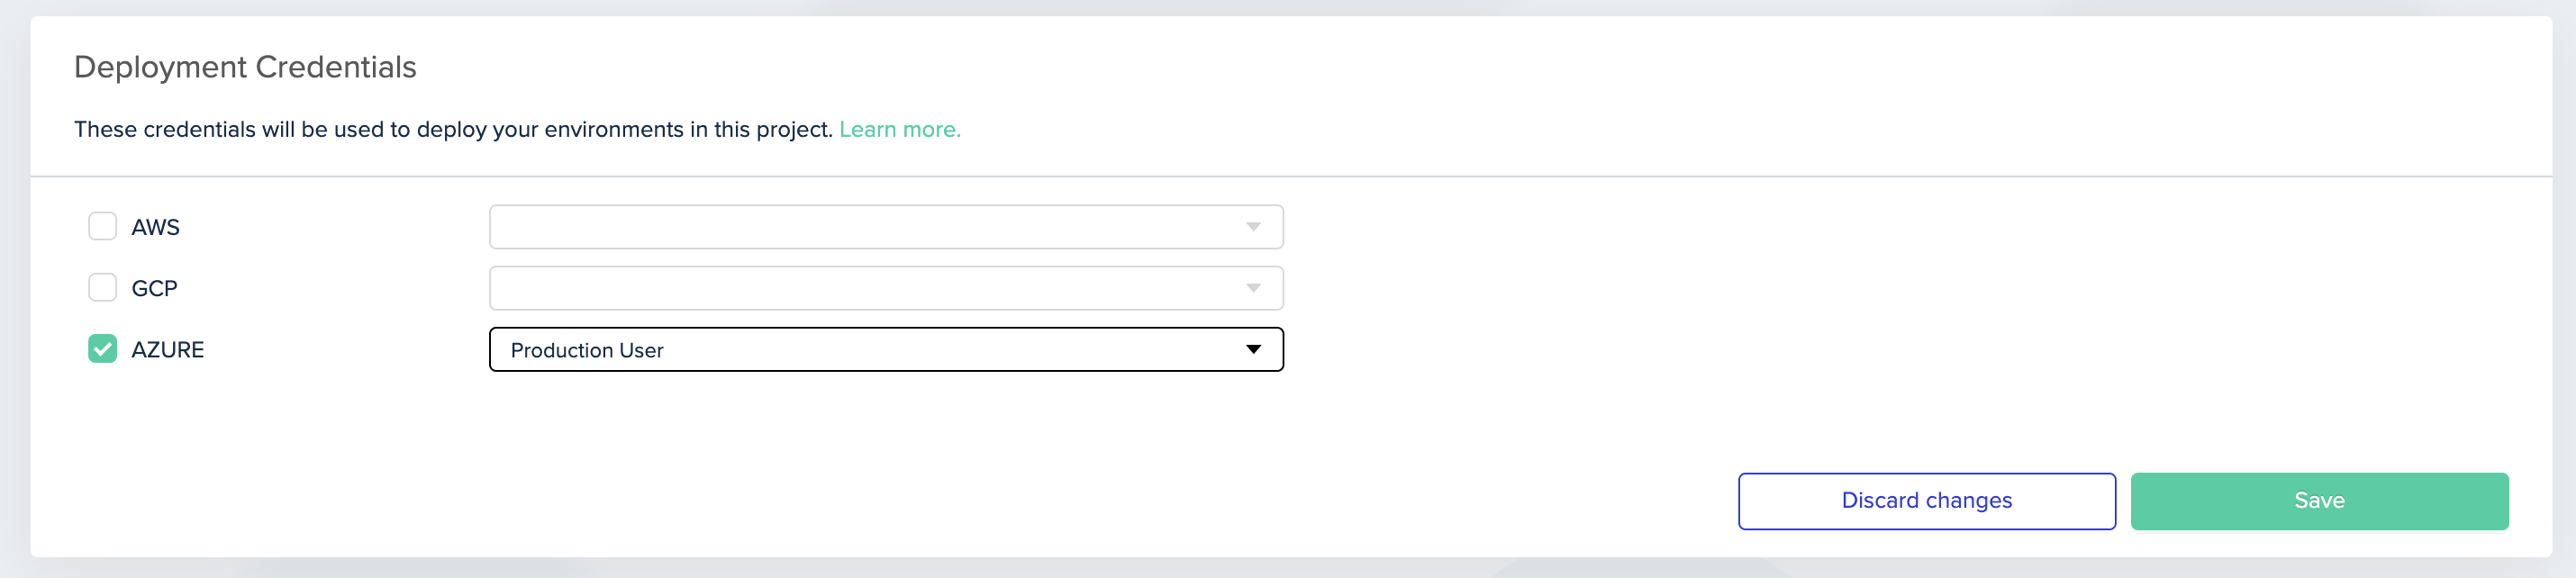
 10. Select the project for which you'd like to use this role, then go to Project Settings and click Credentials
11. Pick the credential you would like to use in this project, then click Save
10. Select the project for which you'd like to use this role, then go to Project Settings and click Credentials
11. Pick the credential you would like to use in this project, then click Save
 **Change credentials per environment**
To override the project's credentials for a specific environment, set these environment variables:
* `ARM_TENANT_ID` - the service principal tenant ID
* `ARM_SUBSCRIPTION_ID` - the subscription ID
* `ARM_CLIENT_SECRET` - the service principal password
* `ARM_CLIENT_ID` - the service principal app ID
### Using OIDC with Azure
See instructions [here](/guides/integrations/oidc-integrations/oidc-with-azure).
## Oracle Cloud Infrastructure (OCI)
### Create an OCI API Key
To create a personal API Key in OCI:
1. Login to OCI
2. Click on your profile pic, and go to User Settings
3. Under the Resources section, click on API Keys, and the Add API Key
4. When you create an API Key, you will be prompted to download a **Private** RSA Key. Download and save it.
5. Finally, click Save
6. After you create the API key, you'll be prompted with a Configuration file preview. Save it as well
### Add your credentials to env zero
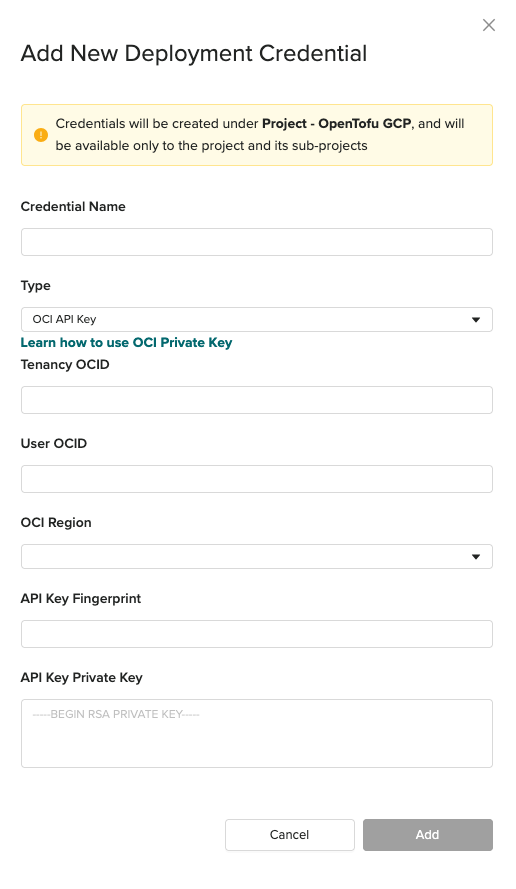
1. Go to the Settings page and click the Credentials tab
2. Under Deployment Credentials, click + Add Credential
3. Enter a name for the new credential
4. Under Type, pick OCI API Key
5. Under Tenancy OCID, copy the tenancy from the configuration file preview
6. Under User OCID, copy the user from the configuration file preview
7. Under OCI Region, pick the region that matches the one in the configuration file preview
8. Under API Key Fingerprint, copy the fingerprint from the configuration file preview
9. Under API Key Private Key, copy the private RSA key you downloaded
When generating a private RSA key via OCI, it's followed by `OCI_API_KEY` after the key ends.\
Remove that section.
**Change credentials per environment**
To override the project's credentials for a specific environment, set these environment variables:
* `ARM_TENANT_ID` - the service principal tenant ID
* `ARM_SUBSCRIPTION_ID` - the subscription ID
* `ARM_CLIENT_SECRET` - the service principal password
* `ARM_CLIENT_ID` - the service principal app ID
### Using OIDC with Azure
See instructions [here](/guides/integrations/oidc-integrations/oidc-with-azure).
## Oracle Cloud Infrastructure (OCI)
### Create an OCI API Key
To create a personal API Key in OCI:
1. Login to OCI
2. Click on your profile pic, and go to User Settings
3. Under the Resources section, click on API Keys, and the Add API Key
4. When you create an API Key, you will be prompted to download a **Private** RSA Key. Download and save it.
5. Finally, click Save
6. After you create the API key, you'll be prompted with a Configuration file preview. Save it as well
### Add your credentials to env zero
1. Go to the Settings page and click the Credentials tab
2. Under Deployment Credentials, click + Add Credential
3. Enter a name for the new credential
4. Under Type, pick OCI API Key
5. Under Tenancy OCID, copy the tenancy from the configuration file preview
6. Under User OCID, copy the user from the configuration file preview
7. Under OCI Region, pick the region that matches the one in the configuration file preview
8. Under API Key Fingerprint, copy the fingerprint from the configuration file preview
9. Under API Key Private Key, copy the private RSA key you downloaded
When generating a private RSA key via OCI, it's followed by `OCI_API_KEY` after the key ends.\
Remove that section.
 10. Click Add
11. Go to the project for which you'd like to use this credential, then go to Project Settings and click Credentials
12. Pick the credential you would like to use in this project, then click Save
## Other Cloud Providers
If you are using Terraform to manage infrastructure in a different provider than the ones mentioned above, check the provider’s documentation for supported authentication options.
Most providers support authentication via environment variables (for example, `CLOUDFLARE_API_TOKEN` for Cloudflare or `FASTLY_API_KEY` for Fastly). You can set these as [Environment Variables](/guides/admin-guide/variables) in env zero at the organization, project, or environment scope, and they will be injected at deployment time.
## Customizing Cloud Authentication per Environment
Generally, Cloud Credentials are defined per env zero project. These are translated into environment variables at runtime (like `AWS_ACCESS_KEY_ID` and `AWS_SECRET_ACCESS_KEY` for AWS). If you'd like to give different credentials to a specific environment, set the relevant environment variables at the environment scope. See [Managing Variables](/guides/admin-guide/variables) for how to set variables per scope.
## Kubernetes
env zero applies your IaC to create resources in your own Kubernetes cluster. This section covers how to give env zero the required permissions.
env zero supports major cloud provider managed clusters, as well as a general `kubeconfig` file.
**Kubernetes authentication in Terraform and Pulumi**
While Helm and Kubernetes templates include native support, env zero also enables Kubernetes authentication within Terraform and Pulumi templates. These connect to your cluster by automatically creating the `kubeconfig` file in the deployment container.
See code examples for [Terraform](https://github.com/env0/templates/tree/master/kubernetes/using-terraform) and [Pulumi](https://github.com/env0/templates/tree/master/kubernetes/using-pulumi).
### Set up your Kubernetes credential
Navigate into Organization Settings and click Credentials\
Under Deployment Credentials, click + Add Credential
10. Click Add
11. Go to the project for which you'd like to use this credential, then go to Project Settings and click Credentials
12. Pick the credential you would like to use in this project, then click Save
## Other Cloud Providers
If you are using Terraform to manage infrastructure in a different provider than the ones mentioned above, check the provider’s documentation for supported authentication options.
Most providers support authentication via environment variables (for example, `CLOUDFLARE_API_TOKEN` for Cloudflare or `FASTLY_API_KEY` for Fastly). You can set these as [Environment Variables](/guides/admin-guide/variables) in env zero at the organization, project, or environment scope, and they will be injected at deployment time.
## Customizing Cloud Authentication per Environment
Generally, Cloud Credentials are defined per env zero project. These are translated into environment variables at runtime (like `AWS_ACCESS_KEY_ID` and `AWS_SECRET_ACCESS_KEY` for AWS). If you'd like to give different credentials to a specific environment, set the relevant environment variables at the environment scope. See [Managing Variables](/guides/admin-guide/variables) for how to set variables per scope.
## Kubernetes
env zero applies your IaC to create resources in your own Kubernetes cluster. This section covers how to give env zero the required permissions.
env zero supports major cloud provider managed clusters, as well as a general `kubeconfig` file.
**Kubernetes authentication in Terraform and Pulumi**
While Helm and Kubernetes templates include native support, env zero also enables Kubernetes authentication within Terraform and Pulumi templates. These connect to your cluster by automatically creating the `kubeconfig` file in the deployment container.
See code examples for [Terraform](https://github.com/env0/templates/tree/master/kubernetes/using-terraform) and [Pulumi](https://github.com/env0/templates/tree/master/kubernetes/using-pulumi).
### Set up your Kubernetes credential
Navigate into Organization Settings and click Credentials\
Under Deployment Credentials, click + Add Credential
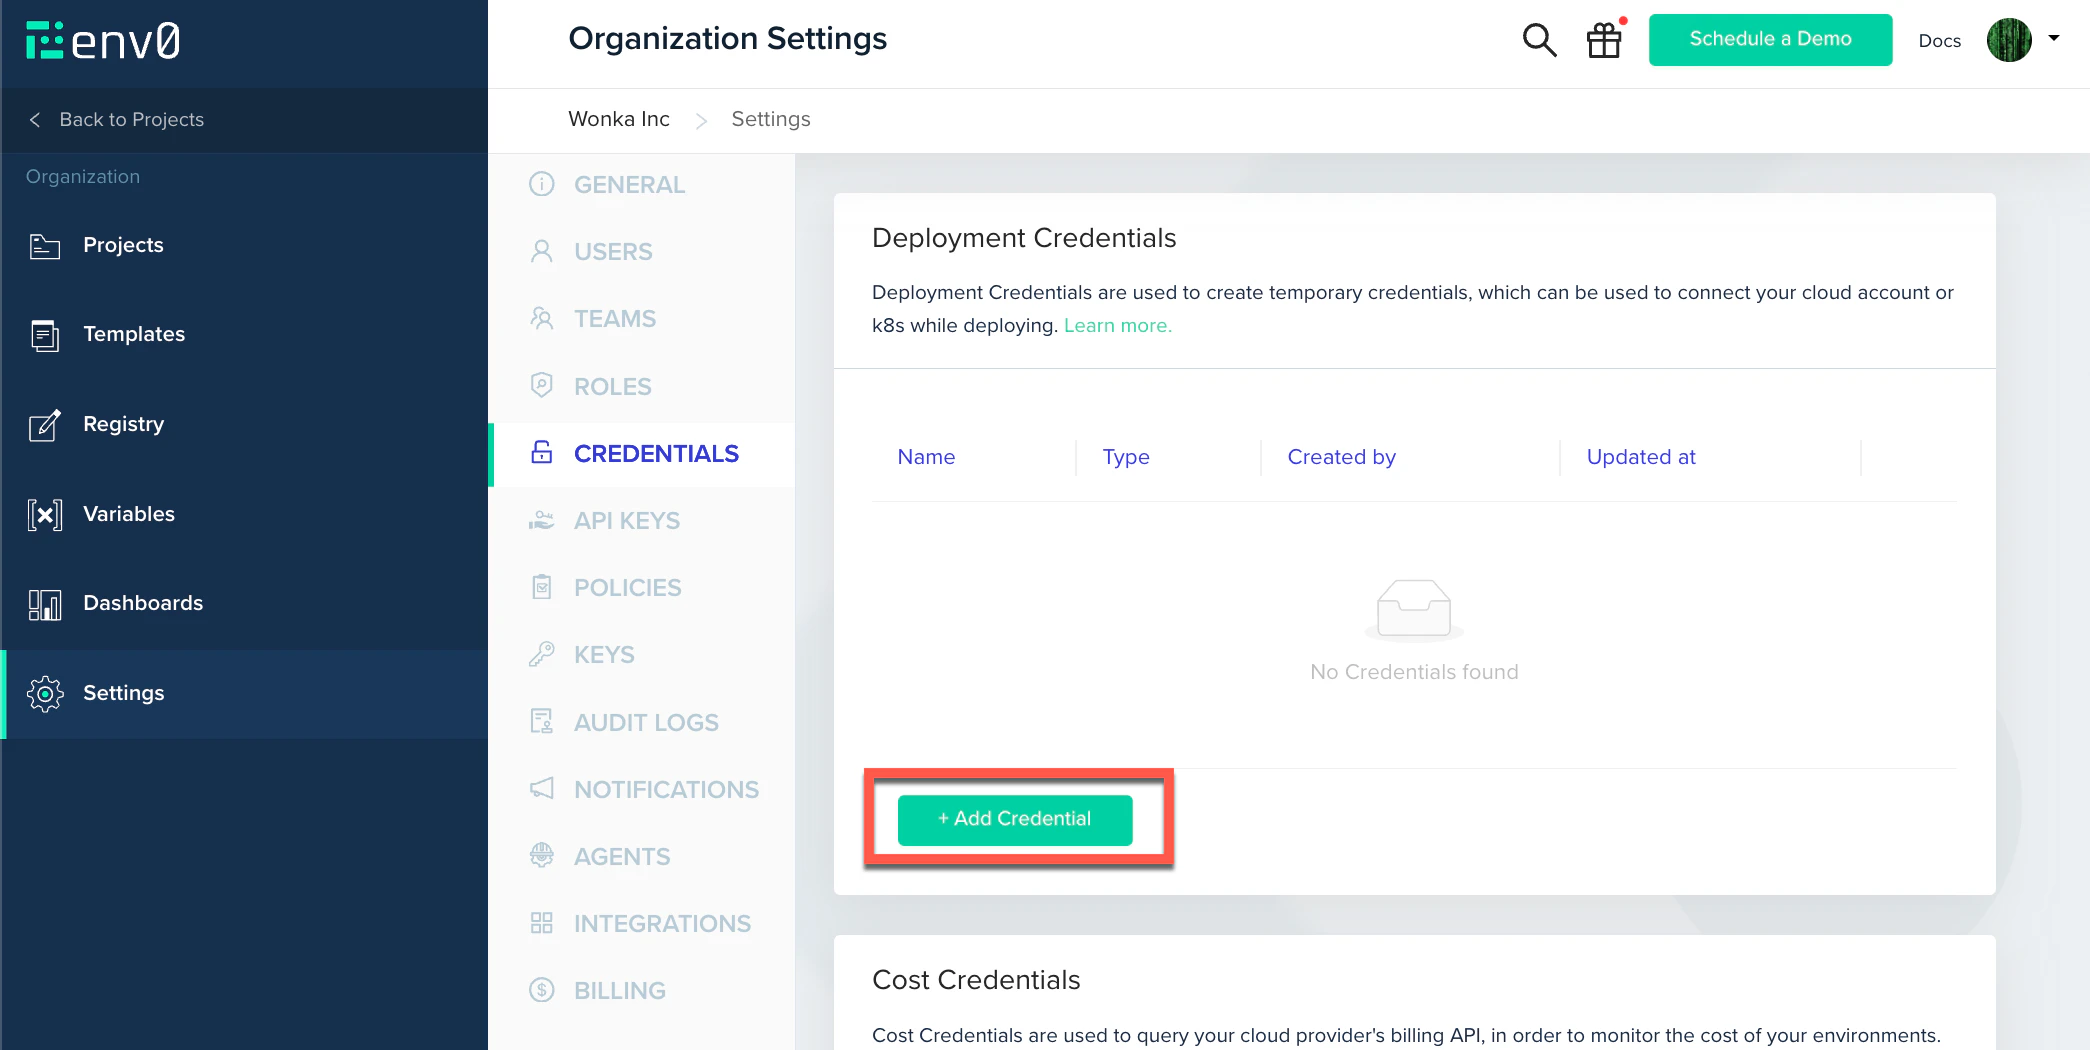 Inside the opened modal, select your desired Kubernetes Cluster authentication method.
### Kubeconfig
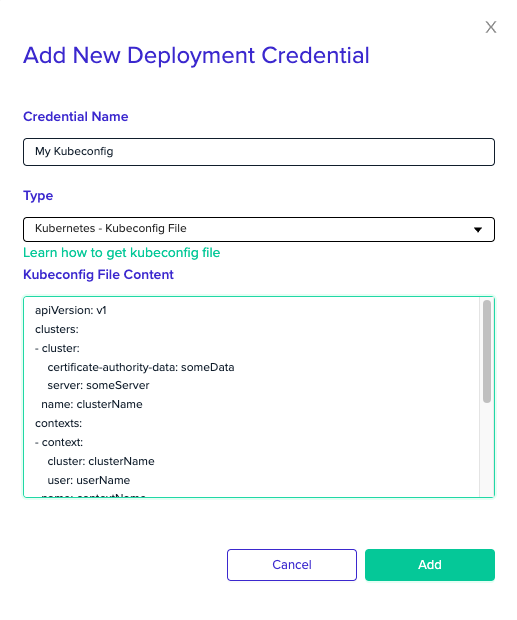
If you want to allow connection to your custom cluster, you can do so by setting up a `kubeconfig` credential in env zero's UI.
Select the **Kubernetes - Kubeconfig File** credential from the Type dropdown menu and paste your valid `kubeconfig` file.
Inside the opened modal, select your desired Kubernetes Cluster authentication method.
### Kubeconfig
If you want to allow connection to your custom cluster, you can do so by setting up a `kubeconfig` credential in env zero's UI.
Select the **Kubernetes - Kubeconfig File** credential from the Type dropdown menu and paste your valid `kubeconfig` file.
 **Constraints**
Your `kubeconfig` should contain exactly one cluster, context and user. The `current-context` field must be provided, and match the given context.
Next, you'll need to associate the created credential with your project.
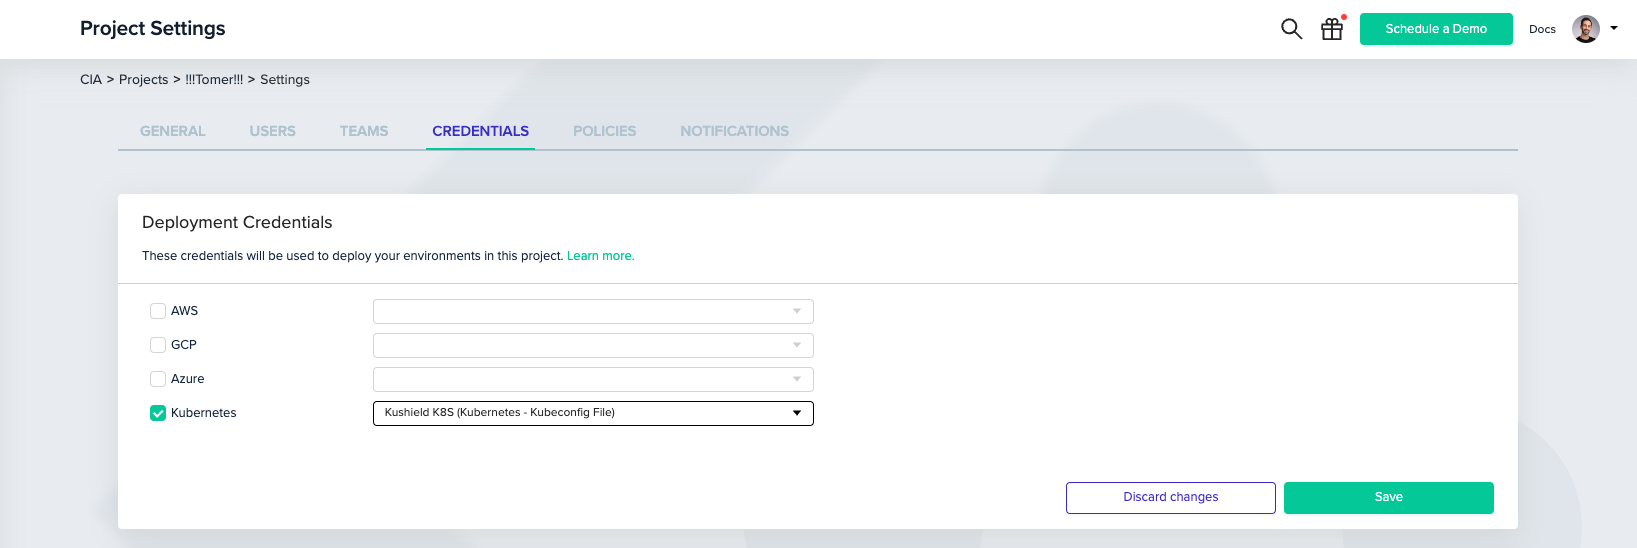
Under Project Settings, click the Credentials tab. Then, check the Kubernetes checkbox and select the credential you created from the dropdown menu.
**Constraints**
Your `kubeconfig` should contain exactly one cluster, context and user. The `current-context` field must be provided, and match the given context.
Next, you'll need to associate the created credential with your project.
Under Project Settings, click the Credentials tab. Then, check the Kubernetes checkbox and select the credential you created from the dropdown menu.
 ### AWS EKS
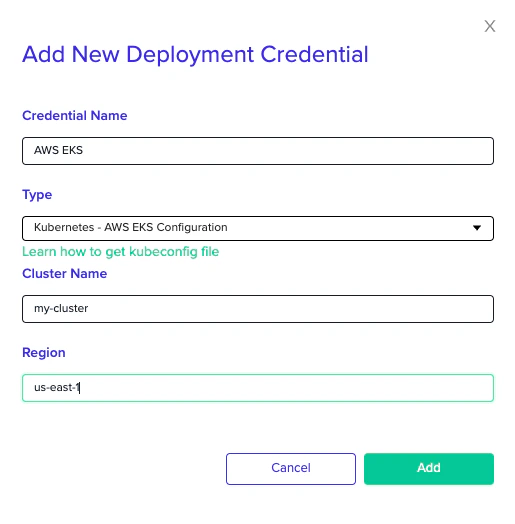
Select the Kubernetes - AWS EKS Configuration credential from the Type dropdown menu, then enter your cluster name and region.
### AWS EKS
Select the Kubernetes - AWS EKS Configuration credential from the Type dropdown menu, then enter your cluster name and region.
 Next, you'll need to associate your EKS credential with your project.
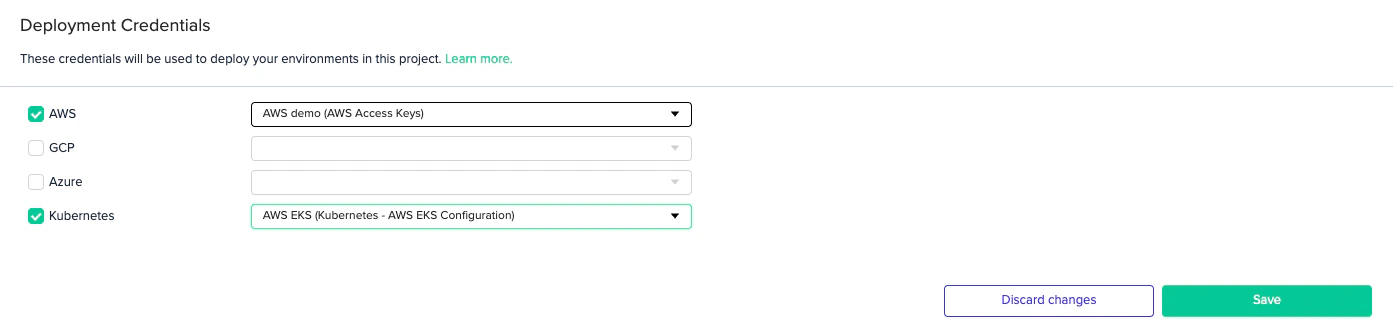
In your Project Settings, click on the Credentials tab. Check the Kubernetes checkbox and select the credential you created from the dropdown menu.
Next, you'll need to associate your EKS credential with your project.
In your Project Settings, click on the Credentials tab. Check the Kubernetes checkbox and select the credential you created from the dropdown menu.
 **Credentials**
To access your cluster, you'll also need to set valid [AWS credentials](/guides/getting-started/connect-your-cloud-account/#amazon-web-services-aws).
### GCP GKE
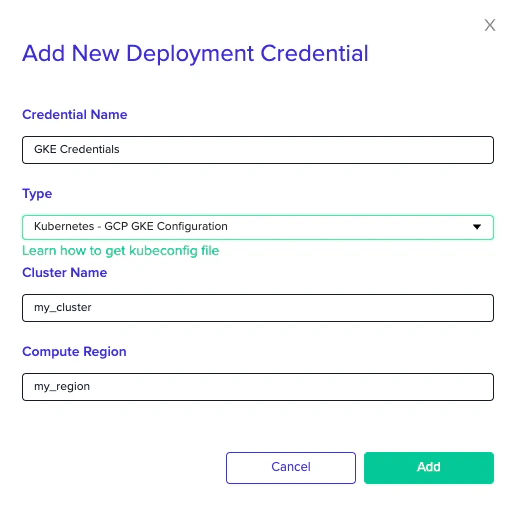
Select the Kubernetes - GCP GKE Configuration credential from the Type dropdown menu and enter your cluster name and region.
**Credentials**
To access your cluster, you'll also need to set valid [AWS credentials](/guides/getting-started/connect-your-cloud-account/#amazon-web-services-aws).
### GCP GKE
Select the Kubernetes - GCP GKE Configuration credential from the Type dropdown menu and enter your cluster name and region.
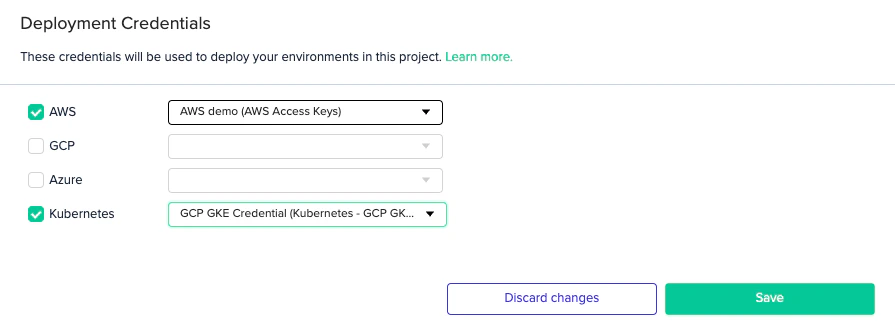
 Next, you'll need to associate the GKE credential with your project.
In your Project Settings, click on the Credentials tab. Then, check the Kubernetes checkbox and select the credential you created from the dropdown menu.
Next, you'll need to associate the GKE credential with your project.
In your Project Settings, click on the Credentials tab. Then, check the Kubernetes checkbox and select the credential you created from the dropdown menu.
 **Credentials**
To access your cluster, you'll also need to set valid [GCP credentials](/guides/getting-started/connect-your-cloud-account/#google-cloud-gcp).
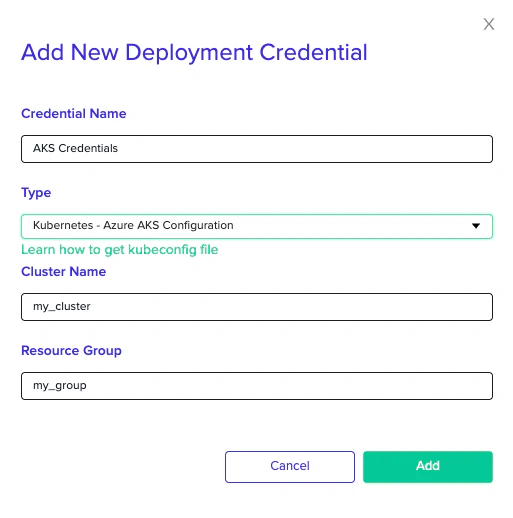
### Azure AKS
Select the Kubernetes - Azure AKS Configuration credential from the Type dropdown menu and enter your cluster name and resource group.
**Credentials**
To access your cluster, you'll also need to set valid [GCP credentials](/guides/getting-started/connect-your-cloud-account/#google-cloud-gcp).
### Azure AKS
Select the Kubernetes - Azure AKS Configuration credential from the Type dropdown menu and enter your cluster name and resource group.
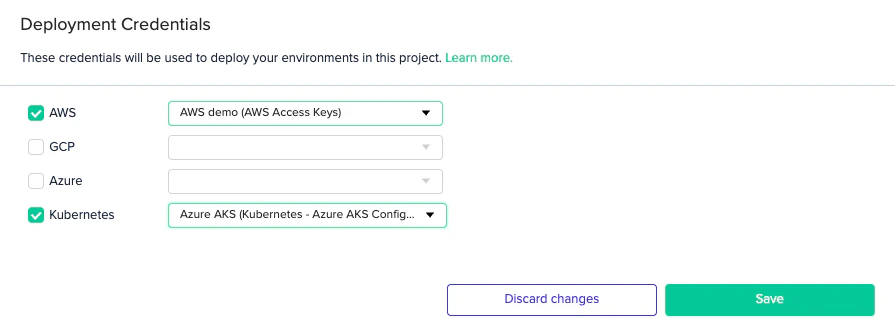
 Next, you'll need to associate the AKS credential with your project.
In your Project Settings, click on the Credentials tab. Then, check the Kubernetes checkbox and select the credential you created from the dropdown menu.
Next, you'll need to associate the AKS credential with your project.
In your Project Settings, click on the Credentials tab. Then, check the Kubernetes checkbox and select the credential you created from the dropdown menu.
 **Credentials**
To access your cluster, you'll also need to set valid [Azure credentials](/guides/getting-started/connect-your-cloud-account/#azure).
## Troubleshooting
**AWS: Access Denied during deployment.** The most common cause is an External ID mismatch. The value in your env zero credential must exactly match the `sts:ExternalId` condition in your AWS trust policy. Find your Organization ID under [Organization Settings](/guides/admin-guide/organizations/#finding-my-organization-id).
**AWS: Session duration error.** The session duration set in env zero must be equal to or less than the Maximum Session Duration configured on the IAM role in AWS. Reduce the duration in your credential settings to match.
**GCP: Invalid credentials.** Re-download the JSON key from the GCP console and paste the complete file, including the opening `{` and closing `}`. A truncated key will fail without a clear error.
**Azure: Authentication failed.** All four values (Client ID, Client Secret, Subscription ID, Tenant ID) must come from the same service principal. Copy each value directly from the `az ad sp create-for-rbac` output to avoid mismatches.
## Next steps
* [Create Your First Template](/guides/getting-started/create-your-first-template) - Link your IaC code to env zero as a reusable template.
* [Deploy Your First Environment](/guides/getting-started/running-your-first-environment) - Deploy your first environment using your connected account.
* [Supported Platforms](/guides/getting-started/supported-platforms) - See all cloud providers and IaC frameworks env zero supports.
**Credentials**
To access your cluster, you'll also need to set valid [Azure credentials](/guides/getting-started/connect-your-cloud-account/#azure).
## Troubleshooting
**AWS: Access Denied during deployment.** The most common cause is an External ID mismatch. The value in your env zero credential must exactly match the `sts:ExternalId` condition in your AWS trust policy. Find your Organization ID under [Organization Settings](/guides/admin-guide/organizations/#finding-my-organization-id).
**AWS: Session duration error.** The session duration set in env zero must be equal to or less than the Maximum Session Duration configured on the IAM role in AWS. Reduce the duration in your credential settings to match.
**GCP: Invalid credentials.** Re-download the JSON key from the GCP console and paste the complete file, including the opening `{` and closing `}`. A truncated key will fail without a clear error.
**Azure: Authentication failed.** All four values (Client ID, Client Secret, Subscription ID, Tenant ID) must come from the same service principal. Copy each value directly from the `az ad sp create-for-rbac` output to avoid mismatches.
## Next steps
* [Create Your First Template](/guides/getting-started/create-your-first-template) - Link your IaC code to env zero as a reusable template.
* [Deploy Your First Environment](/guides/getting-started/running-your-first-environment) - Deploy your first environment using your connected account.
* [Supported Platforms](/guides/getting-started/supported-platforms) - See all cloud providers and IaC frameworks env zero supports.