> ## Documentation Index
> Fetch the complete documentation index at: https://docs.envzero.com/llms.txt
> Use this file to discover all available pages before exploring further.
# Connect Your Git Repository
> Connect your git repository to env zero using OAuth for GitHub.com, GitLab.com, and Bitbucket.org. SSH keys and HTTPS tokens for self-hosted providers.
**Using GitHub.com, GitLab.com, or Bitbucket.org with a public repository?** Skip this page. OAuth is handled automatically during template creation. Continue to [Connect Your Cloud Account](/guides/getting-started/connect-your-cloud-account).
This step assumes you have already [created your organization](/guides/getting-started/create-your-organization).
env zero supports three methods for accessing your git repositories. The right method depends on your provider.
## OAuth (recommended for GitHub.com, GitLab.com, and Bitbucket.org)
OAuth is the recommended way to connect cloud-hosted repositories. It requires no key management, no token rotation, and grants access to your organization's repositories in a single authorization step.
**You do not set up OAuth here.** It happens automatically when you create your first template. When you select GitHub.com, GitLab.com, or Bitbucket.org during template creation, env zero opens an OAuth popup and stores the connection for your organization. All future templates using the same provider reuse that connection.
If you are using GitHub.com, GitLab.com, or Bitbucket.org with a private repository, skip this page and continue to [Connect Your Cloud Account](/guides/getting-started/connect-your-cloud-account). The OAuth setup happens in the [Create Your First Template](/guides/getting-started/create-your-first-template) step.
## SSH keys (self-hosted providers and private modules)
Use SSH keys if:
* Your repository is hosted on GitHub Enterprise, GitLab self-managed, or Bitbucket Server
* Your IaC code pulls private Terraform or OpenTofu modules using `ssh://` URLs (an SSH key is required even if you use OAuth for the main repository)
### Generate an SSH key pair and add it to your repository
This is vendor-specific. See the instructions for your provider:
* GitHub - [Adding a new SSH key to your GitHub account](https://docs.github.com/en/authentication/connecting-to-github-with-ssh/adding-a-new-ssh-key-to-your-github-account)
* GitLab - [Create and add your SSH key pair](https://docs.gitlab.com/ee/user/ssh.html#generate-an-ssh-key-pair)
* Bitbucket - [Set up an SSH key](https://confluence.atlassian.com/bitbucket/set-up-ssh-for-git-728138079.html)
### Add the SSH key to your organization
1. Open **Organization Settings** and go to the **Keys** tab.
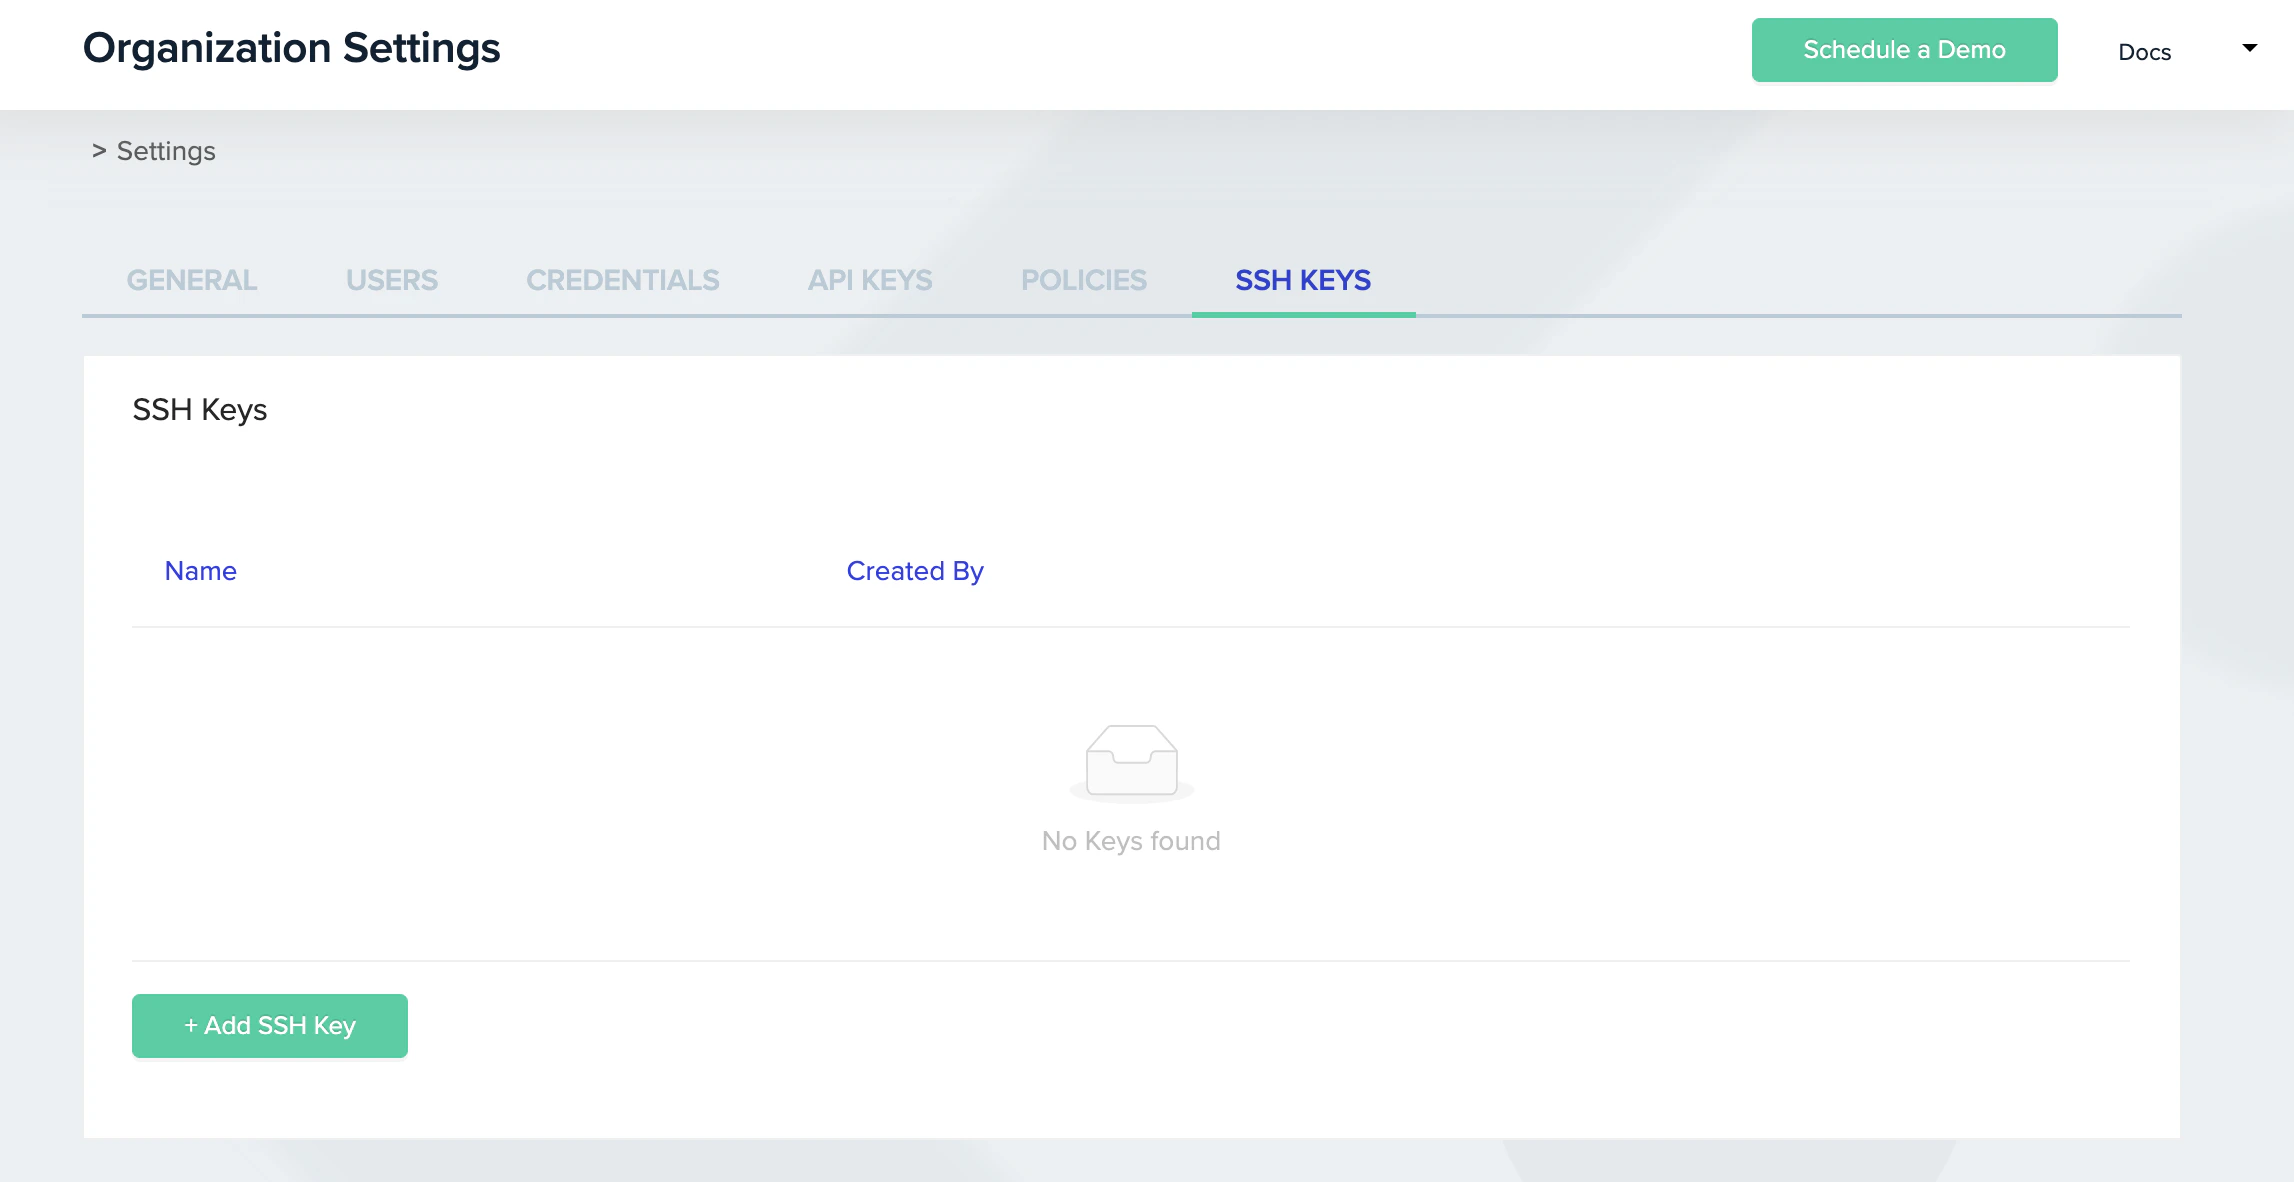 2. Click **+ Add SSH Key**.
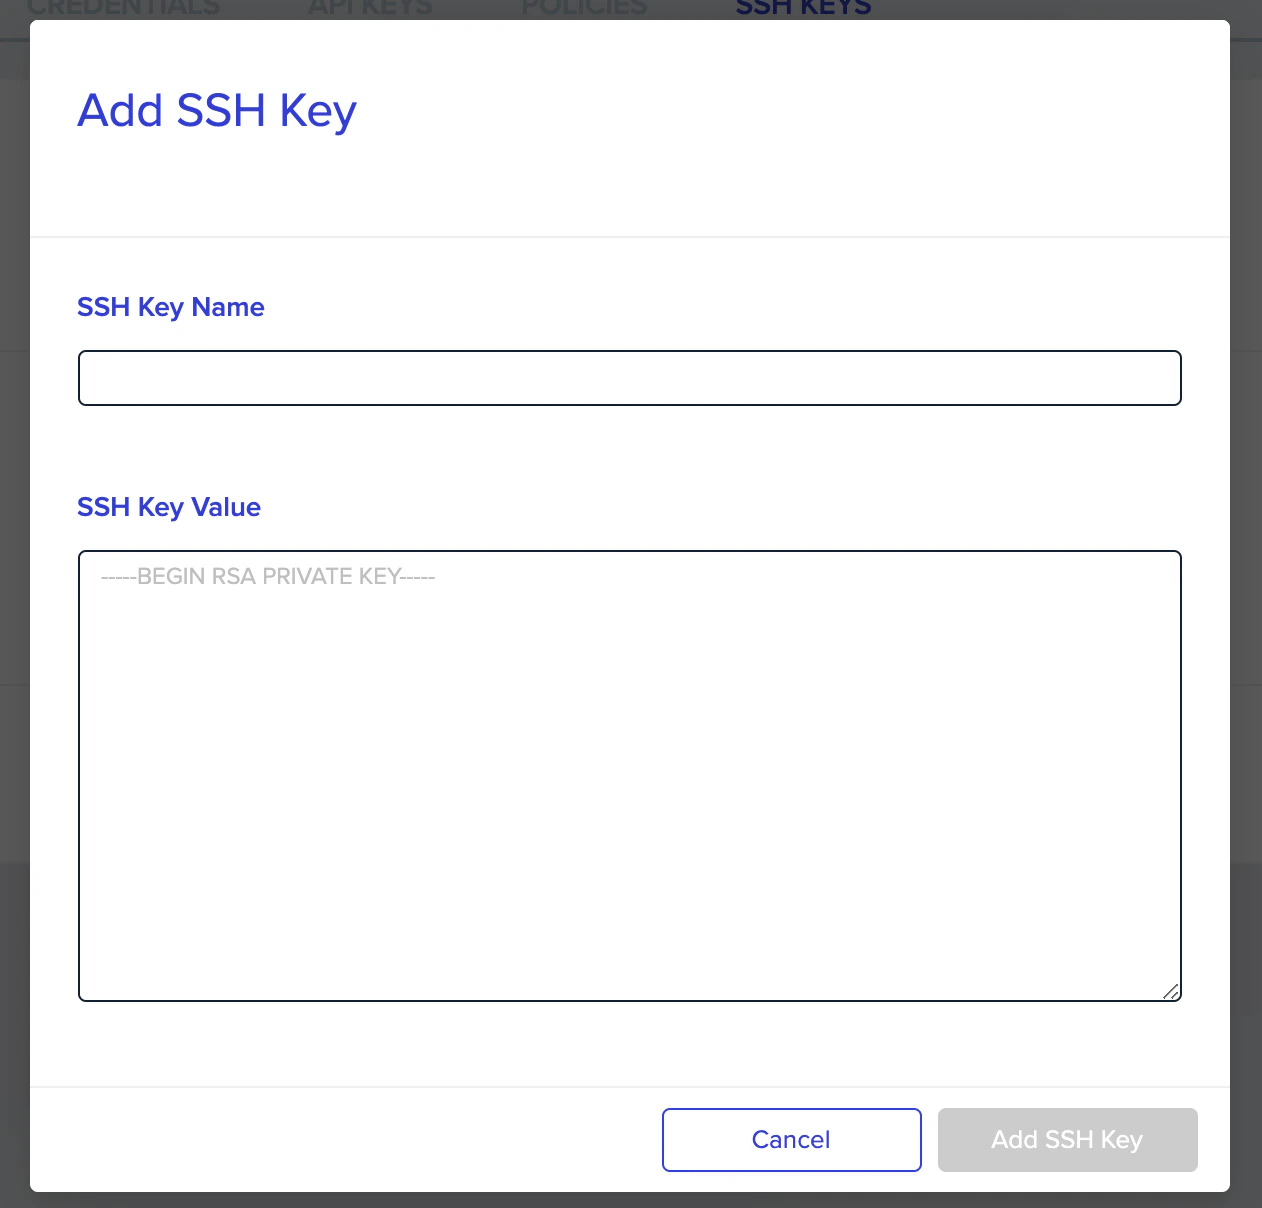
3. Enter a name in the `SSH Key Name` box to identify this key later.
4. Paste the private key you generated into the `SSH Key Value` box.
5. Click **Save**.
The private key starts with `-----BEGIN` and ends with `-----END`. If what you pasted ends with an email address or username, that is the public key. Use the other file instead.
2. Click **+ Add SSH Key**.
3. Enter a name in the `SSH Key Name` box to identify this key later.
4. Paste the private key you generated into the `SSH Key Value` box.
5. Click **Save**.
The private key starts with `-----BEGIN` and ends with `-----END`. If what you pasted ends with an email address or username, that is the public key. Use the other file instead.
 ## HTTPS tokens (self-hosted providers)
Use HTTPS tokens as an alternative to SSH for repositories on GitHub Enterprise, GitLab self-managed, Azure DevOps, or Bitbucket Server. HTTPS tokens are also supported for cloud-hosted providers if your organization policy requires token-based auth instead of OAuth.
### Generate an access token in your repository
This is vendor-specific. See the instructions for your provider:
* GitHub - [Personal access tokens](https://docs.github.com/en/authentication/keeping-your-account-and-data-secure/managing-your-personal-access-tokens)
* GitLab - [Personal access tokens](https://docs.gitlab.com/ee/user/profile/personal_access_tokens)
* Bitbucket - [App Passwords](https://confluence.atlassian.com/bitbucket/app-passwords-828781300.html)
* Azure DevOps - [Personal access tokens](https://learn.microsoft.com/en-us/azure/devops/organizations/accounts/use-personal-access-tokens-to-authenticate)
Token authentication fails most often because of missing scopes. Minimum required scopes: GitHub needs `repo`; GitLab needs `read_repository` and `api`; Bitbucket App Passwords need **Repositories: Read**; Azure DevOps needs **Code: Read**.
### Add the token to your organization
1. Open **Organization Settings** and go to the **Credentials** tab.
## HTTPS tokens (self-hosted providers)
Use HTTPS tokens as an alternative to SSH for repositories on GitHub Enterprise, GitLab self-managed, Azure DevOps, or Bitbucket Server. HTTPS tokens are also supported for cloud-hosted providers if your organization policy requires token-based auth instead of OAuth.
### Generate an access token in your repository
This is vendor-specific. See the instructions for your provider:
* GitHub - [Personal access tokens](https://docs.github.com/en/authentication/keeping-your-account-and-data-secure/managing-your-personal-access-tokens)
* GitLab - [Personal access tokens](https://docs.gitlab.com/ee/user/profile/personal_access_tokens)
* Bitbucket - [App Passwords](https://confluence.atlassian.com/bitbucket/app-passwords-828781300.html)
* Azure DevOps - [Personal access tokens](https://learn.microsoft.com/en-us/azure/devops/organizations/accounts/use-personal-access-tokens-to-authenticate)
Token authentication fails most often because of missing scopes. Minimum required scopes: GitHub needs `repo`; GitLab needs `read_repository` and `api`; Bitbucket App Passwords need **Repositories: Read**; Azure DevOps needs **Code: Read**.
### Add the token to your organization
1. Open **Organization Settings** and go to the **Credentials** tab.
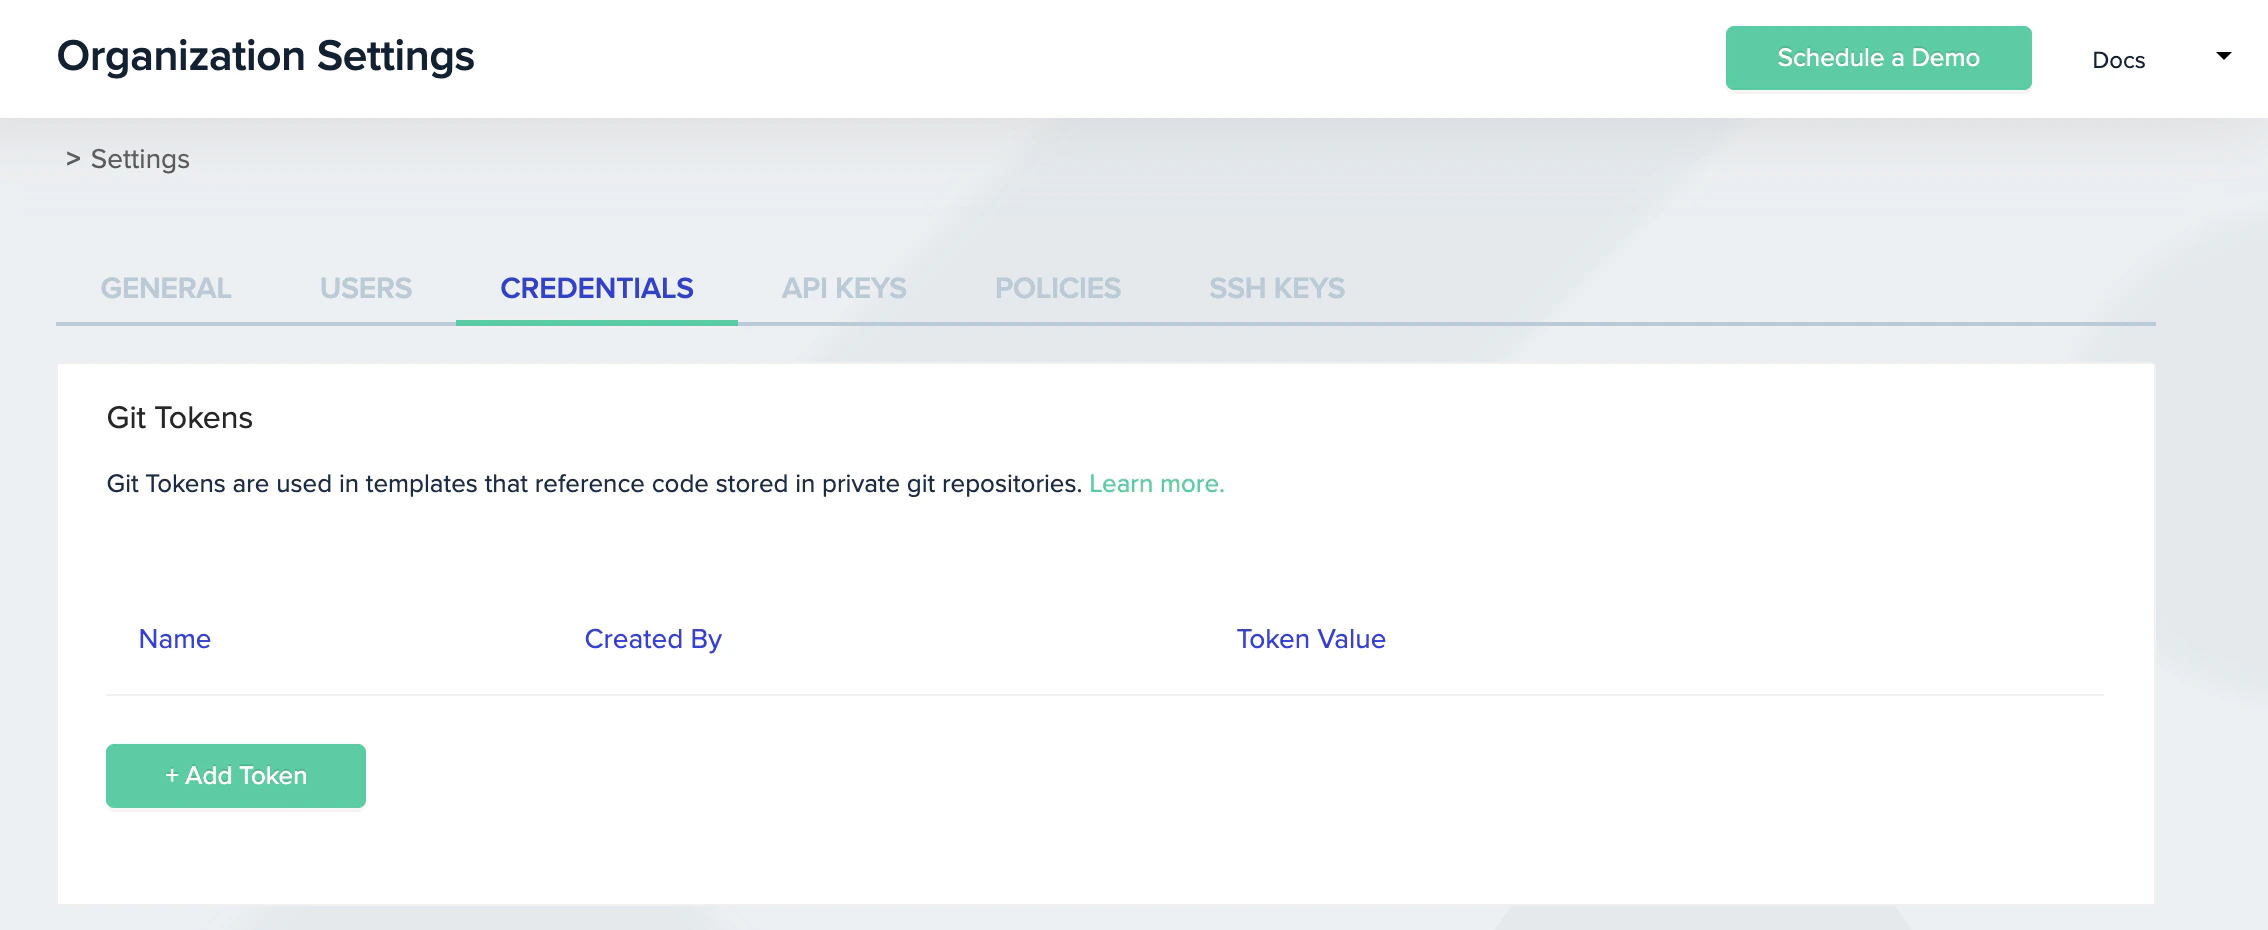 2. In the **Git Tokens** section, click **+ Add Token**.
3. Enter a name in the `Name` box to identify this token later.
4. Enter the token value in the `Value` box.
5. Click **Add**.
2. In the **Git Tokens** section, click **+ Add Token**.
3. Enter a name in the `Name` box to identify this token later.
4. Enter the token value in the `Value` box.
5. Click **Add**.
 ## Next steps
* [Connect Your Cloud Account](/guides/getting-started/connect-your-cloud-account) - Grant env zero permissions to deploy to your cloud.
* [Create Your First Template](/guides/getting-started/create-your-first-template) - Use your VCS connection to create your first template.
* [Supported Platforms](/guides/getting-started/supported-platforms) - Check which VCS providers and IaC tools are supported.
## Next steps
* [Connect Your Cloud Account](/guides/getting-started/connect-your-cloud-account) - Grant env zero permissions to deploy to your cloud.
* [Create Your First Template](/guides/getting-started/create-your-first-template) - Use your VCS connection to create your first template.
* [Supported Platforms](/guides/getting-started/supported-platforms) - Check which VCS providers and IaC tools are supported.