> ## Documentation Index
> Fetch the complete documentation index at: https://docs.envzero.com/llms.txt
> Use this file to discover all available pages before exploring further.
# OIDC for AWS
> Connect env zero to AWS using OIDC by creating an IAM Identity Provider, assigning an IAM role, and adding a sub claim condition to the trust policy.
This guide is to help you connect to AWS with OIDC, instead of using a static API Key and Secret.
## Overview
This guide will show you how to create an AWS Identity Provider and IAM role to go along with it, and configure env zero to utilize OIDC. This will allow you to authenticate to AWS and get temporary credentials by accepting env zero's OIDC token. Refer to [env zero's OIDC configuration](/guides/integrations/oidc-integrations) for more information
This guide configures a **v2** OIDC credential (the recommended format), where the token audience is `sts.amazonaws.com`. See [Token versions](/guides/integrations/oidc-integrations#token-versions-v2-per-provider-audience-and-v1-legacy) for background. If you already authenticate to AWS with a v1 credential (audience set to the env zero client ID), see [Migrating an existing v1 credential](#migrating-an-existing-v1-credential) below.
## AWS Identity Provider and IAM Role
To be able to authenticate with OIDC, we will need to create an Identity Provider in your AWS account and attach an IAM role to it. We will follow [this guide](https://docs.aws.amazon.com/IAM/latest/UserGuide/id_roles_providers_create_oidc.html) by AWS.
### Create an Identity Provider
1. Login to your desired AWS account and go to Identity and Access Management (IAM)
2. In the left side menu under Access management, click on Identity Providers
3. Click on Add provider
4. Choose the OpenID Connect option
5. For Provider URL, enter [https://login.app.env0.com/](https://login.app.env0.com/) and click Get thumbprint
6. Under Audience, enter `sts.amazonaws.com`
7. Add tags if you wish, then click Add provider to create the identity provider
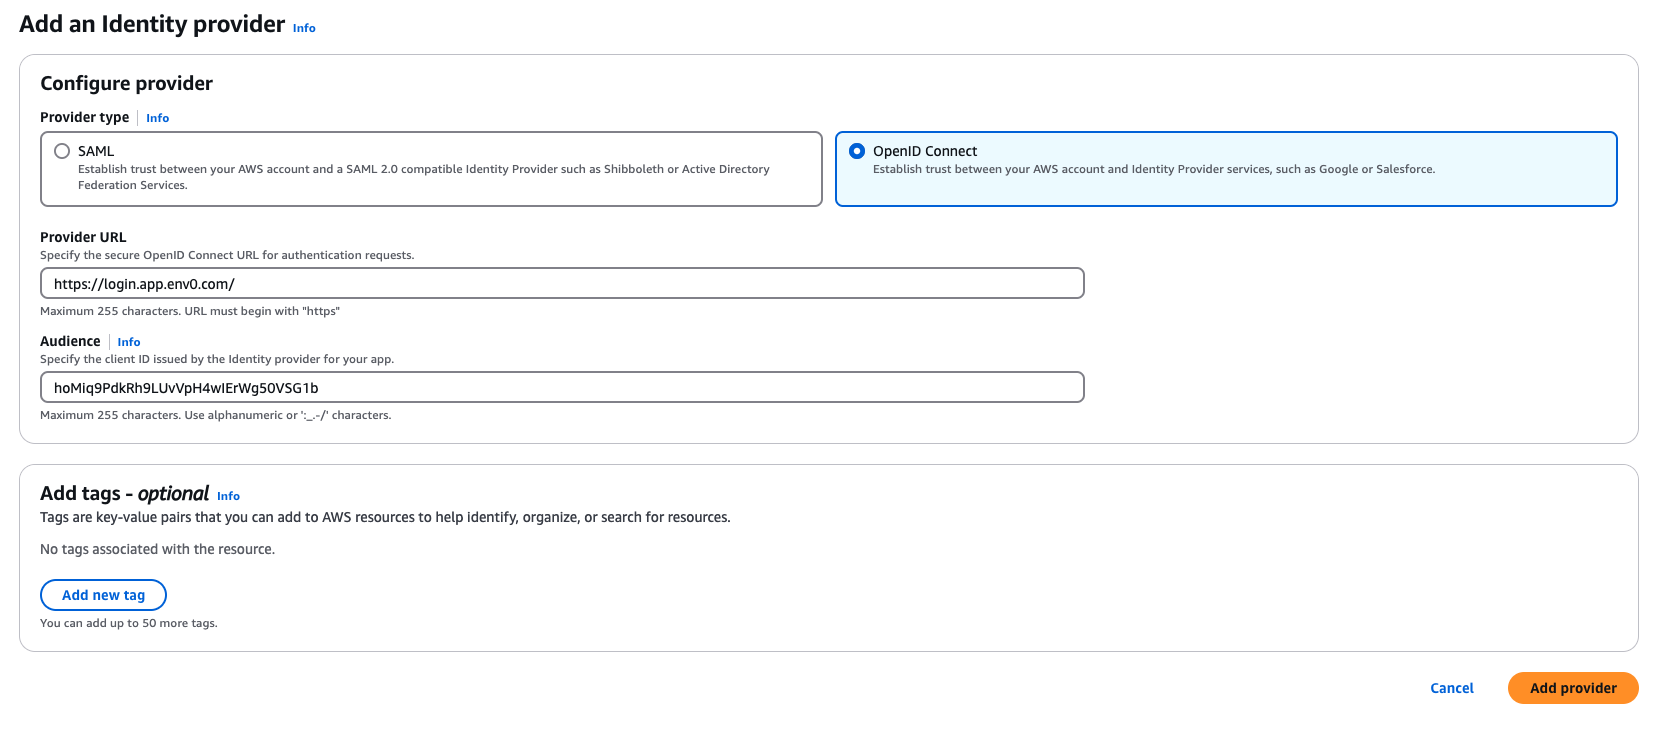 Enter the Provider URL exactly as `https://login.app.env0.com/`, **including the trailing slash**. AWS keys the identity provider on the token issuer including that slash, so a slash-less registration fails later with `No OpenIDConnect provider found in your account`.
### Assign an IAM Role
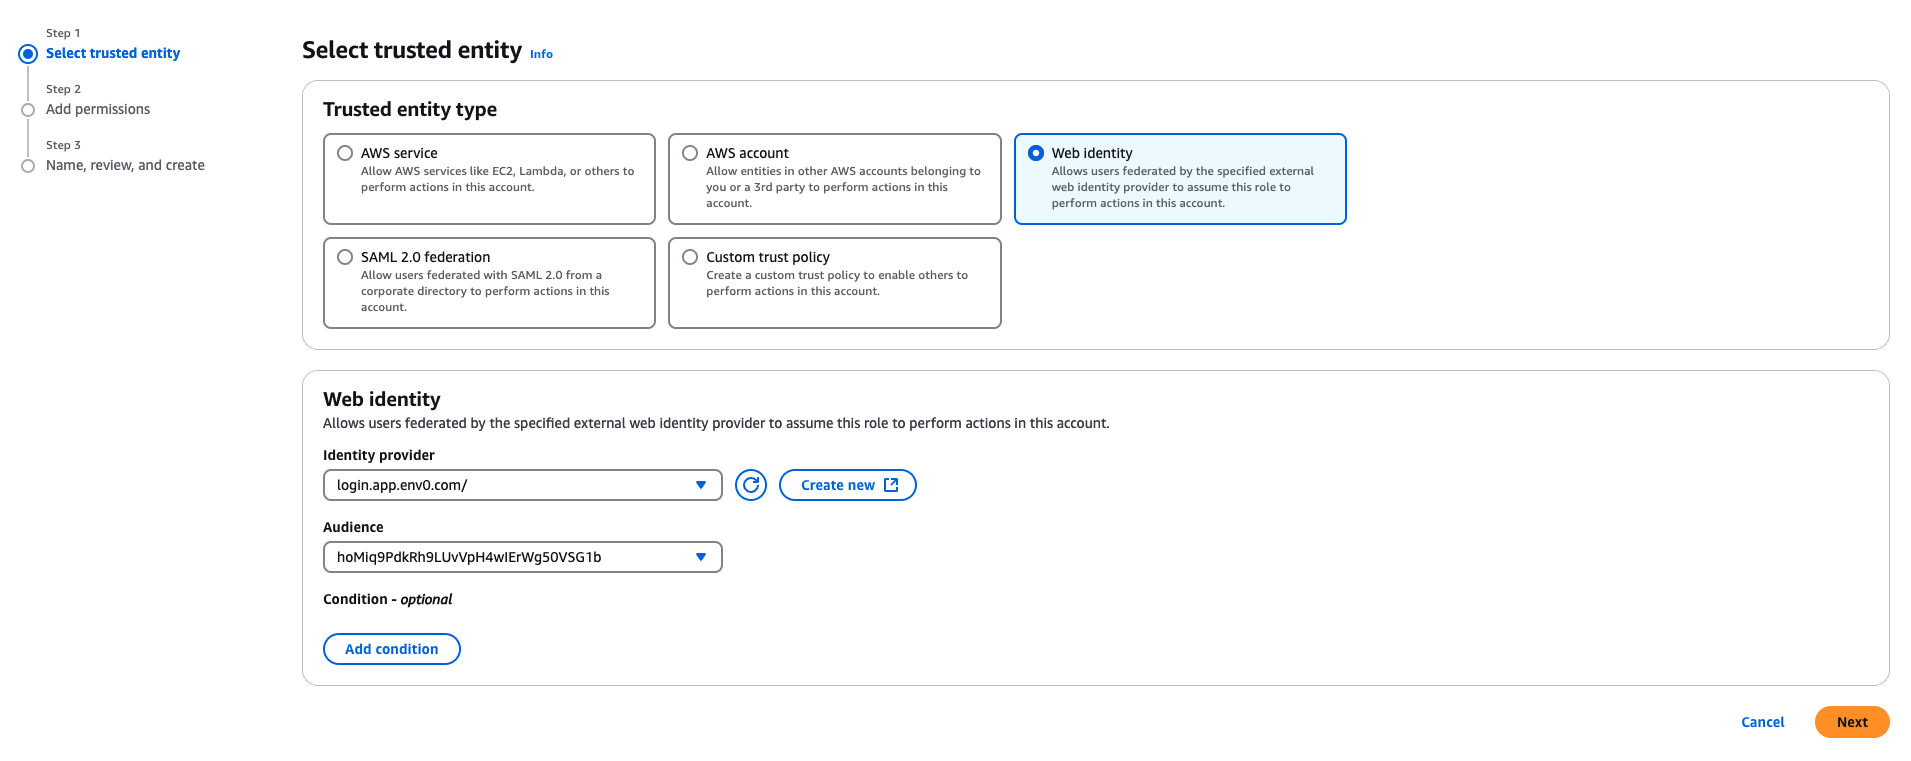
1. Go to the Identity Provider you created in the previous step
2. In the Audiences section, select `sts.amazonaws.com` then click on the Actions button and select Assign role
3. Select the Create a new role option which will open the Create role wizard
4. Select the Web Identity option. Under Identity provider select `login.app.env0.com/:aud` and under Audience select `sts.amazonaws.com` then click Next: Permissions
5. In the permissions phase, select the permissions you would like this role to have. Remember, these permissions will be used to deploy your IaC so make sure they match the permissions your code needs.
6. Add tags if you wish
7. In the Review phase, give the role a name and a description, then click Create role
Enter the Provider URL exactly as `https://login.app.env0.com/`, **including the trailing slash**. AWS keys the identity provider on the token issuer including that slash, so a slash-less registration fails later with `No OpenIDConnect provider found in your account`.
### Assign an IAM Role
1. Go to the Identity Provider you created in the previous step
2. In the Audiences section, select `sts.amazonaws.com` then click on the Actions button and select Assign role
3. Select the Create a new role option which will open the Create role wizard
4. Select the Web Identity option. Under Identity provider select `login.app.env0.com/:aud` and under Audience select `sts.amazonaws.com` then click Next: Permissions
5. In the permissions phase, select the permissions you would like this role to have. Remember, these permissions will be used to deploy your IaC so make sure they match the permissions your code needs.
6. Add tags if you wish
7. In the Review phase, give the role a name and a description, then click Create role
 ### Add a `sub` Claim
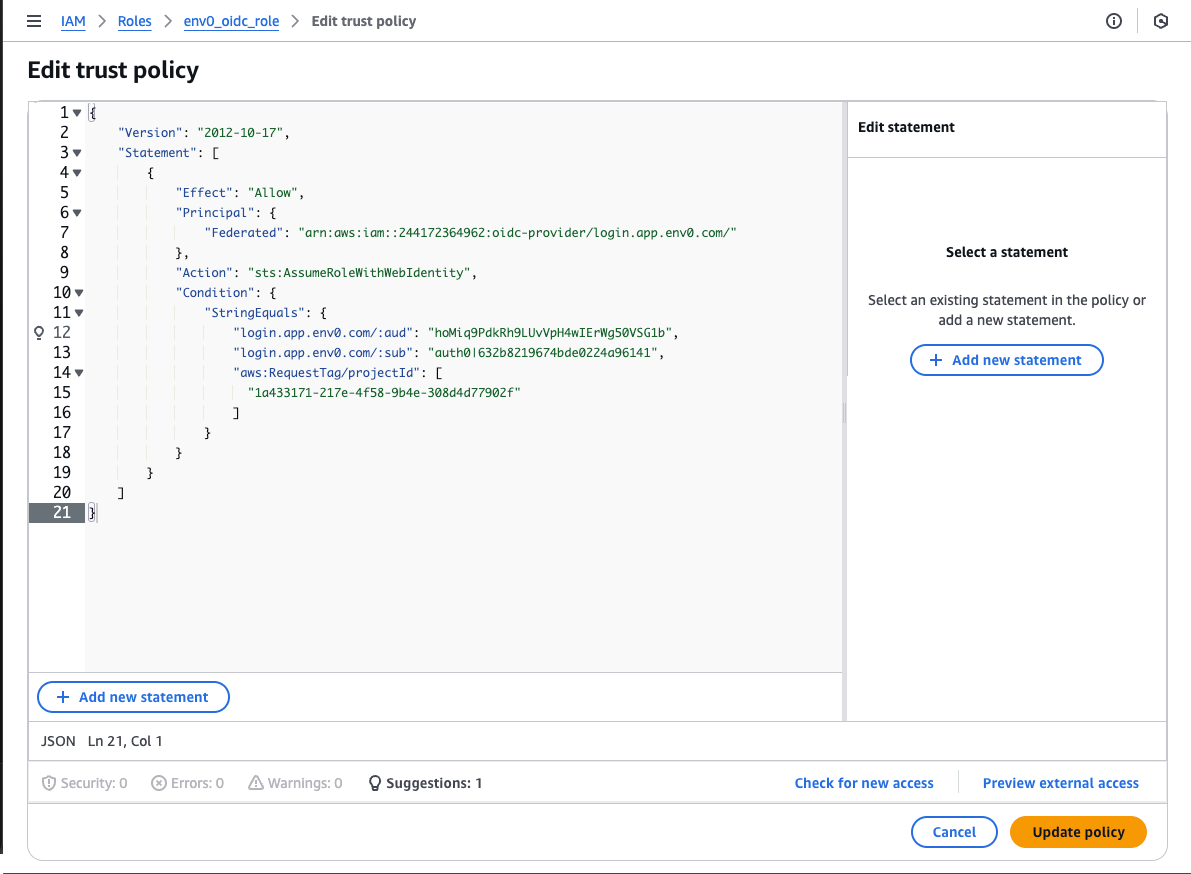
1. Retrieve your organization `sub` identifier using [this guide](/guides/integrations/oidc-integrations/oidc-retrieving-your-subject-identifier)
2. Go to the AWS IAM role you created in the previous step
3. In the Trust Relationships tab, click Edit Trust Policy
4. Under the Action section, add the following:
1. `sts:AssumeRoleWithWebIdentity`
2. `sts:TagSession`
5. UnderCondition, go to the StringEquals section of the Policy JSON add `"login.app.env0.com/:sub": "{your_organization_sub}"` – Make sure you substitute `{your_organization_sub} `with the sub value you retrieved in the first step. It should be something like `"login.app.env0.com/:sub": "auth0|632b8219674bde0224a96141"`
6. Now click Update policy
```json Trust Policy theme={null}
{
"Version": "2012-10-17",
"Statement": [
{
"Effect": "Allow",
"Principal": {
"Federated": "arn:aws:iam::XXXXXXXXXXXX:oidc-provider/login.app.env0.com/"
},
"Action": [
"sts:AssumeRoleWithWebIdentity",
"sts:TagSession"
],
"Condition": {
"StringEquals": {
"login.app.env0.com/:aud": "sts.amazonaws.com",
"login.app.env0.com/:sub": "auth0|632b8219674bde0224a96141"
}
}
}
]
}
```
**Self-Hosted Agent Users**
For EKS users, you will also need to add `"Action": "sts:AssumeRoleWithWebIdentity"` to either your node role or service account role where your agent is running.
### Custom Claims with AWS Session Tags (Optional)
AWS OIDC identity providers support only a few out-of-the-box claims, which is a limitation when you want to control who inside env zero can access this AWS role. You can read more about [available claims for AWS here](https://docs.aws.amazon.com/IAM/latest/UserGuide/reference_policies_iam-condition-keys.html#condition-keys-wif).
AWS lets you pass [Session tags](https://docs.aws.amazon.com/IAM/latest/UserGuide/id_session-tags.html) inside the JWT token, allowing you to have more control and define the right access level.
1. `organizationId` - The env zero Organization ID
2. `projectId` - The env zero Project ID
3. `templateId` - The env zero Template ID
4. `environmentId` - The env zero Environment ID
5. `deployerEmail` - The email address of the user who created this deployment
Always gate the trust policy on `aws:RequestTag/organizationId` (or `aws:PrincipalTag/organizationId`). Other claims like `projectId` or `environmentId` can be combined for finer scoping, but `organizationId` must be present so that only tokens issued for your env zero organization can assume the role.
Never use `env0Tag` as a trust condition. It is a free-form, user-controlled string with no validation or per-tenant uniqueness. See [Using claims in IAM trust policies](/guides/integrations/oidc-integrations#using-claims-in-iam-trust-policies).
AWS Session Tags Limitation
As session tags have a length limitation, we will only add specific claims. These will undoubtedly give you the desired access control for your AWS role.
You can read more about [AWS session tags limitation here](https://docs.aws.amazon.com/IAM/latest/UserGuide/id_session-tags.html#id_session-tags_operations).
To configure the AWS session tags, you need to edit the role you created in the previous steps:
1. Go to the AWS IAM Role you created in the previous step
2. In the Trust Relationships tab, click Edit Trust Policy
3. Under Condition, select StringEquals for Policy JSON and always include `aws:RequestTag/organizationId` as the primary gate. You can optionally add further conditions such as `aws:RequestTag/projectId` to scope access to a specific project. For example: `"aws:RequestTag/projectId": ["1a433171-217e-4f58-9b4e-308d4d77902f"]`. See the full example below.
4. Click Update policy
```json Trust Policy theme={null}
{
"Version": "2012-10-17",
"Statement": [
{
"Effect": "Allow",
"Principal": {
"Federated": "arn:aws:iam::XXXXXXXXXXXX:oidc-provider/login.app.env0.com/"
},
"Action": [
"sts:AssumeRoleWithWebIdentity",
"sts:TagSession"
],
"Condition": {
"StringEquals": {
"login.app.env0.com/:aud": "sts.amazonaws.com",
"login.app.env0.com/:sub": "auth0|632b8219674bde0224a96141",
"aws:RequestTag/organizationId": [
"66a38abf-69bc-4cb7-ad73-7f61e389079f"
],
"aws:RequestTag/projectId": [
"1a433171-217e-4f58-9b4e-308d4d77902f"
]
}
}
}
]
}
```
### Add a `sub` Claim
1. Retrieve your organization `sub` identifier using [this guide](/guides/integrations/oidc-integrations/oidc-retrieving-your-subject-identifier)
2. Go to the AWS IAM role you created in the previous step
3. In the Trust Relationships tab, click Edit Trust Policy
4. Under the Action section, add the following:
1. `sts:AssumeRoleWithWebIdentity`
2. `sts:TagSession`
5. UnderCondition, go to the StringEquals section of the Policy JSON add `"login.app.env0.com/:sub": "{your_organization_sub}"` – Make sure you substitute `{your_organization_sub} `with the sub value you retrieved in the first step. It should be something like `"login.app.env0.com/:sub": "auth0|632b8219674bde0224a96141"`
6. Now click Update policy
```json Trust Policy theme={null}
{
"Version": "2012-10-17",
"Statement": [
{
"Effect": "Allow",
"Principal": {
"Federated": "arn:aws:iam::XXXXXXXXXXXX:oidc-provider/login.app.env0.com/"
},
"Action": [
"sts:AssumeRoleWithWebIdentity",
"sts:TagSession"
],
"Condition": {
"StringEquals": {
"login.app.env0.com/:aud": "sts.amazonaws.com",
"login.app.env0.com/:sub": "auth0|632b8219674bde0224a96141"
}
}
}
]
}
```
**Self-Hosted Agent Users**
For EKS users, you will also need to add `"Action": "sts:AssumeRoleWithWebIdentity"` to either your node role or service account role where your agent is running.
### Custom Claims with AWS Session Tags (Optional)
AWS OIDC identity providers support only a few out-of-the-box claims, which is a limitation when you want to control who inside env zero can access this AWS role. You can read more about [available claims for AWS here](https://docs.aws.amazon.com/IAM/latest/UserGuide/reference_policies_iam-condition-keys.html#condition-keys-wif).
AWS lets you pass [Session tags](https://docs.aws.amazon.com/IAM/latest/UserGuide/id_session-tags.html) inside the JWT token, allowing you to have more control and define the right access level.
1. `organizationId` - The env zero Organization ID
2. `projectId` - The env zero Project ID
3. `templateId` - The env zero Template ID
4. `environmentId` - The env zero Environment ID
5. `deployerEmail` - The email address of the user who created this deployment
Always gate the trust policy on `aws:RequestTag/organizationId` (or `aws:PrincipalTag/organizationId`). Other claims like `projectId` or `environmentId` can be combined for finer scoping, but `organizationId` must be present so that only tokens issued for your env zero organization can assume the role.
Never use `env0Tag` as a trust condition. It is a free-form, user-controlled string with no validation or per-tenant uniqueness. See [Using claims in IAM trust policies](/guides/integrations/oidc-integrations#using-claims-in-iam-trust-policies).
AWS Session Tags Limitation
As session tags have a length limitation, we will only add specific claims. These will undoubtedly give you the desired access control for your AWS role.
You can read more about [AWS session tags limitation here](https://docs.aws.amazon.com/IAM/latest/UserGuide/id_session-tags.html#id_session-tags_operations).
To configure the AWS session tags, you need to edit the role you created in the previous steps:
1. Go to the AWS IAM Role you created in the previous step
2. In the Trust Relationships tab, click Edit Trust Policy
3. Under Condition, select StringEquals for Policy JSON and always include `aws:RequestTag/organizationId` as the primary gate. You can optionally add further conditions such as `aws:RequestTag/projectId` to scope access to a specific project. For example: `"aws:RequestTag/projectId": ["1a433171-217e-4f58-9b4e-308d4d77902f"]`. See the full example below.
4. Click Update policy
```json Trust Policy theme={null}
{
"Version": "2012-10-17",
"Statement": [
{
"Effect": "Allow",
"Principal": {
"Federated": "arn:aws:iam::XXXXXXXXXXXX:oidc-provider/login.app.env0.com/"
},
"Action": [
"sts:AssumeRoleWithWebIdentity",
"sts:TagSession"
],
"Condition": {
"StringEquals": {
"login.app.env0.com/:aud": "sts.amazonaws.com",
"login.app.env0.com/:sub": "auth0|632b8219674bde0224a96141",
"aws:RequestTag/organizationId": [
"66a38abf-69bc-4cb7-ad73-7f61e389079f"
],
"aws:RequestTag/projectId": [
"1a433171-217e-4f58-9b4e-308d4d77902f"
]
}
}
}
]
}
```
 ## Configure env0 OIDC Credential
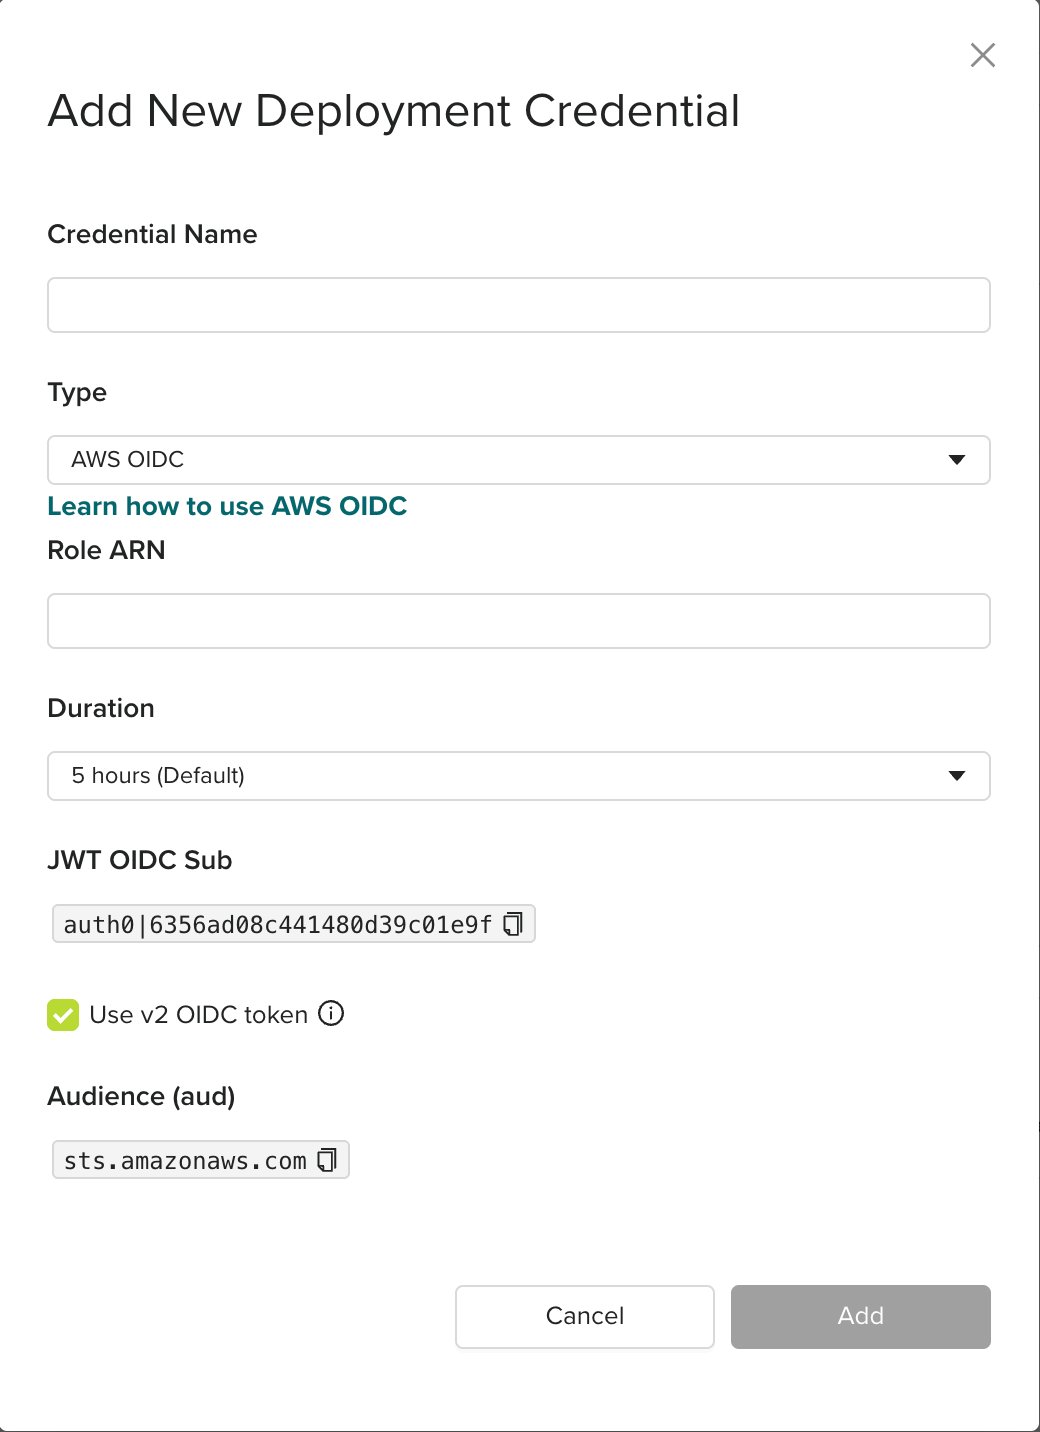
Go to the organization's credentials page and create a new deployment credential. Select AWS OIDC type and enter the following fields:
* `Role ARN` - The ARN of the role that was previously created
* `Duration` - **Configure to 1 hour for OIDC.** Determines how long the token will be valid. The token is generated when deployment starts, not when the credential is being created.
* **Use v2 OIDC token** - check this box so env zero mints a token with the `sts.amazonaws.com` audience configured above. The form shows the resulting `Audience (aud)` value. Leaving it unchecked produces a v1 token, which the trust policy in this guide will reject.
## Configure env0 OIDC Credential
Go to the organization's credentials page and create a new deployment credential. Select AWS OIDC type and enter the following fields:
* `Role ARN` - The ARN of the role that was previously created
* `Duration` - **Configure to 1 hour for OIDC.** Determines how long the token will be valid. The token is generated when deployment starts, not when the credential is being created.
* **Use v2 OIDC token** - check this box so env zero mints a token with the `sts.amazonaws.com` audience configured above. The form shows the resulting `Audience (aud)` value. Leaving it unchecked produces a v1 token, which the trust policy in this guide will reject.
 Troubleshooting
**Not authorized to perform sts:AssumeRoleWithWebIdentity**
* Make sure your AssumeRole durations match the env zero credential and your maximum session in the role. Otherwise, try setting your duration to 1 hour.
### Override Role ARN - Deploying to a Different AWS Account
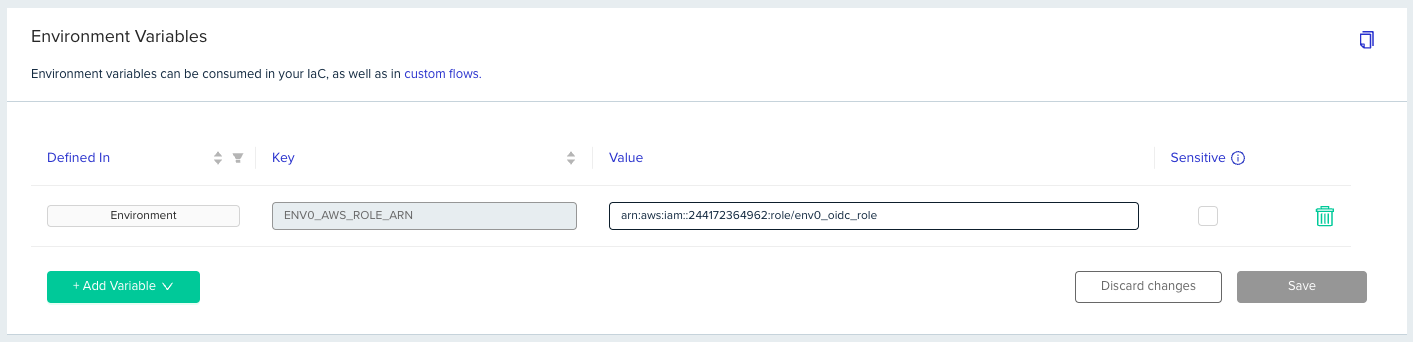
If you would like to authenticate to a different AWS account within a specific environment you can override the Role ARN configuration by using an environment variable. To do so, you will need to add an environment variable named `ENV0_AWS_ROLE_ARN`and set the value to the role you created in your AWS account you would like to authenticate to.
Troubleshooting
**Not authorized to perform sts:AssumeRoleWithWebIdentity**
* Make sure your AssumeRole durations match the env zero credential and your maximum session in the role. Otherwise, try setting your duration to 1 hour.
### Override Role ARN - Deploying to a Different AWS Account
If you would like to authenticate to a different AWS account within a specific environment you can override the Role ARN configuration by using an environment variable. To do so, you will need to add an environment variable named `ENV0_AWS_ROLE_ARN`and set the value to the role you created in your AWS account you would like to authenticate to.
 ## Migrating an existing v1 credential
If you already authenticate to AWS with a v1 env zero OIDC credential, your identity provider audience and role trust condition use the env zero client ID (`hoMiq9PdkRh9LUvVpH4wIErWg50VSG1b`) rather than `sts.amazonaws.com`. You can migrate to v2 without downtime by keeping both audiences on the same identity provider during the switch:
1. **Add the v2 audience to the identity provider.** Open your existing `login.app.env0.com/` identity provider in IAM and add `sts.amazonaws.com` as a second audience, alongside the existing client ID. One provider can serve both v1 and v2 roles.
2. **Update the role trust condition** from `"login.app.env0.com/:aud": "hoMiq9PdkRh9LUvVpH4wIErWg50VSG1b"` to `"login.app.env0.com/:aud": "sts.amazonaws.com"`, keeping the `:sub` condition unchanged. See the full policy below.
3. **Enable v2 on the credential.** Edit the AWS OIDC credential in env zero and check **Use v2 OIDC token**. The next deployment mints a token with `aud: sts.amazonaws.com`.
4. **Keep the old audience until everything else migrates.** Leave the v1 client-ID audience on the identity provider until every other consumer of the shared `https://prod.env0.com` audience has moved to v2 (log forwarding and cloud cost scanning, for example, still use it). Remove it only once nothing depends on it.
```json Trust Policy (v2) theme={null}
{
"Version": "2012-10-17",
"Statement": [
{
"Effect": "Allow",
"Principal": {
"Federated": "arn:aws:iam::XXXXXXXXXXXX:oidc-provider/login.app.env0.com/"
},
"Action": [
"sts:AssumeRoleWithWebIdentity",
"sts:TagSession"
],
"Condition": {
"StringEquals": {
"login.app.env0.com/:aud": "sts.amazonaws.com",
"login.app.env0.com/:sub": "auth0|632b8219674bde0224a96141"
}
}
}
]
}
```
## Next steps
* [Retrieve OIDC Subject Identifier](/guides/integrations/oidc-integrations/oidc-retrieving-your-subject-identifier) - Find the subject identifier for your OIDC token.
* [OIDC for Azure](/guides/integrations/oidc-integrations/oidc-with-azure) - Set up OIDC for Azure as an alternative cloud provider.
* [OIDC for GCP](/guides/integrations/oidc-integrations/oidc-with-google-cloud-platform) - Set up OIDC for Google Cloud Platform.
## Migrating an existing v1 credential
If you already authenticate to AWS with a v1 env zero OIDC credential, your identity provider audience and role trust condition use the env zero client ID (`hoMiq9PdkRh9LUvVpH4wIErWg50VSG1b`) rather than `sts.amazonaws.com`. You can migrate to v2 without downtime by keeping both audiences on the same identity provider during the switch:
1. **Add the v2 audience to the identity provider.** Open your existing `login.app.env0.com/` identity provider in IAM and add `sts.amazonaws.com` as a second audience, alongside the existing client ID. One provider can serve both v1 and v2 roles.
2. **Update the role trust condition** from `"login.app.env0.com/:aud": "hoMiq9PdkRh9LUvVpH4wIErWg50VSG1b"` to `"login.app.env0.com/:aud": "sts.amazonaws.com"`, keeping the `:sub` condition unchanged. See the full policy below.
3. **Enable v2 on the credential.** Edit the AWS OIDC credential in env zero and check **Use v2 OIDC token**. The next deployment mints a token with `aud: sts.amazonaws.com`.
4. **Keep the old audience until everything else migrates.** Leave the v1 client-ID audience on the identity provider until every other consumer of the shared `https://prod.env0.com` audience has moved to v2 (log forwarding and cloud cost scanning, for example, still use it). Remove it only once nothing depends on it.
```json Trust Policy (v2) theme={null}
{
"Version": "2012-10-17",
"Statement": [
{
"Effect": "Allow",
"Principal": {
"Federated": "arn:aws:iam::XXXXXXXXXXXX:oidc-provider/login.app.env0.com/"
},
"Action": [
"sts:AssumeRoleWithWebIdentity",
"sts:TagSession"
],
"Condition": {
"StringEquals": {
"login.app.env0.com/:aud": "sts.amazonaws.com",
"login.app.env0.com/:sub": "auth0|632b8219674bde0224a96141"
}
}
}
]
}
```
## Next steps
* [Retrieve OIDC Subject Identifier](/guides/integrations/oidc-integrations/oidc-retrieving-your-subject-identifier) - Find the subject identifier for your OIDC token.
* [OIDC for Azure](/guides/integrations/oidc-integrations/oidc-with-azure) - Set up OIDC for Azure as an alternative cloud provider.
* [OIDC for GCP](/guides/integrations/oidc-integrations/oidc-with-google-cloud-platform) - Set up OIDC for Google Cloud Platform.