> ## Documentation Index
> Fetch the complete documentation index at: https://docs.envzero.com/llms.txt
> Use this file to discover all available pages before exploring further.
# OIDC for Vault
> Connect env zero to HashiCorp Vault using OIDC by enabling the JWT Authentication method, configuring a KV secrets store, and creating an access policy.
This guide is to help you connect to [Vault](https://www.vaultproject.io/) with OIDC.
## Overview
This guide will show you how to create a JWT Authentication Method, and how to configure env zero to utilize OIDC to authenticate to your vault cluster to retrieve secrets. Refer to [env zero's OIDC configuration](/guides/integrations/oidc-integrations).
This guide configures a **v2** OIDC credential (the recommended format), where the token audience is `api://env0-vault`. See [Token versions](/guides/integrations/oidc-integrations#token-versions-v2-per-provider-audience-and-v1-legacy) for background. If you already authenticate to Vault with a v1 credential (the role's `bound_audiences` set to `https://prod.env0.com`), see [Migrating an existing v1 credential](#migrating-an-existing-v1-credential) below.
We are going to follow the Vault documentation on how to create a [JWT Authentication](https://developer.hashicorp.com/vault/docs/auth/jwt#jwt-authentication)
## JWT Authentication Method
1. Login to your vault cluster
2. In the side navigation bar click on `Access`
3. Choose `Authentication Methods` in the left side menu
4. Click on the `Enable new method` button and it will open the Authentication method creation wizard
5. Choose `JWT`
6. Expand `Method Options` add a description and the relevant configuration and click on the `Enabled Method` button
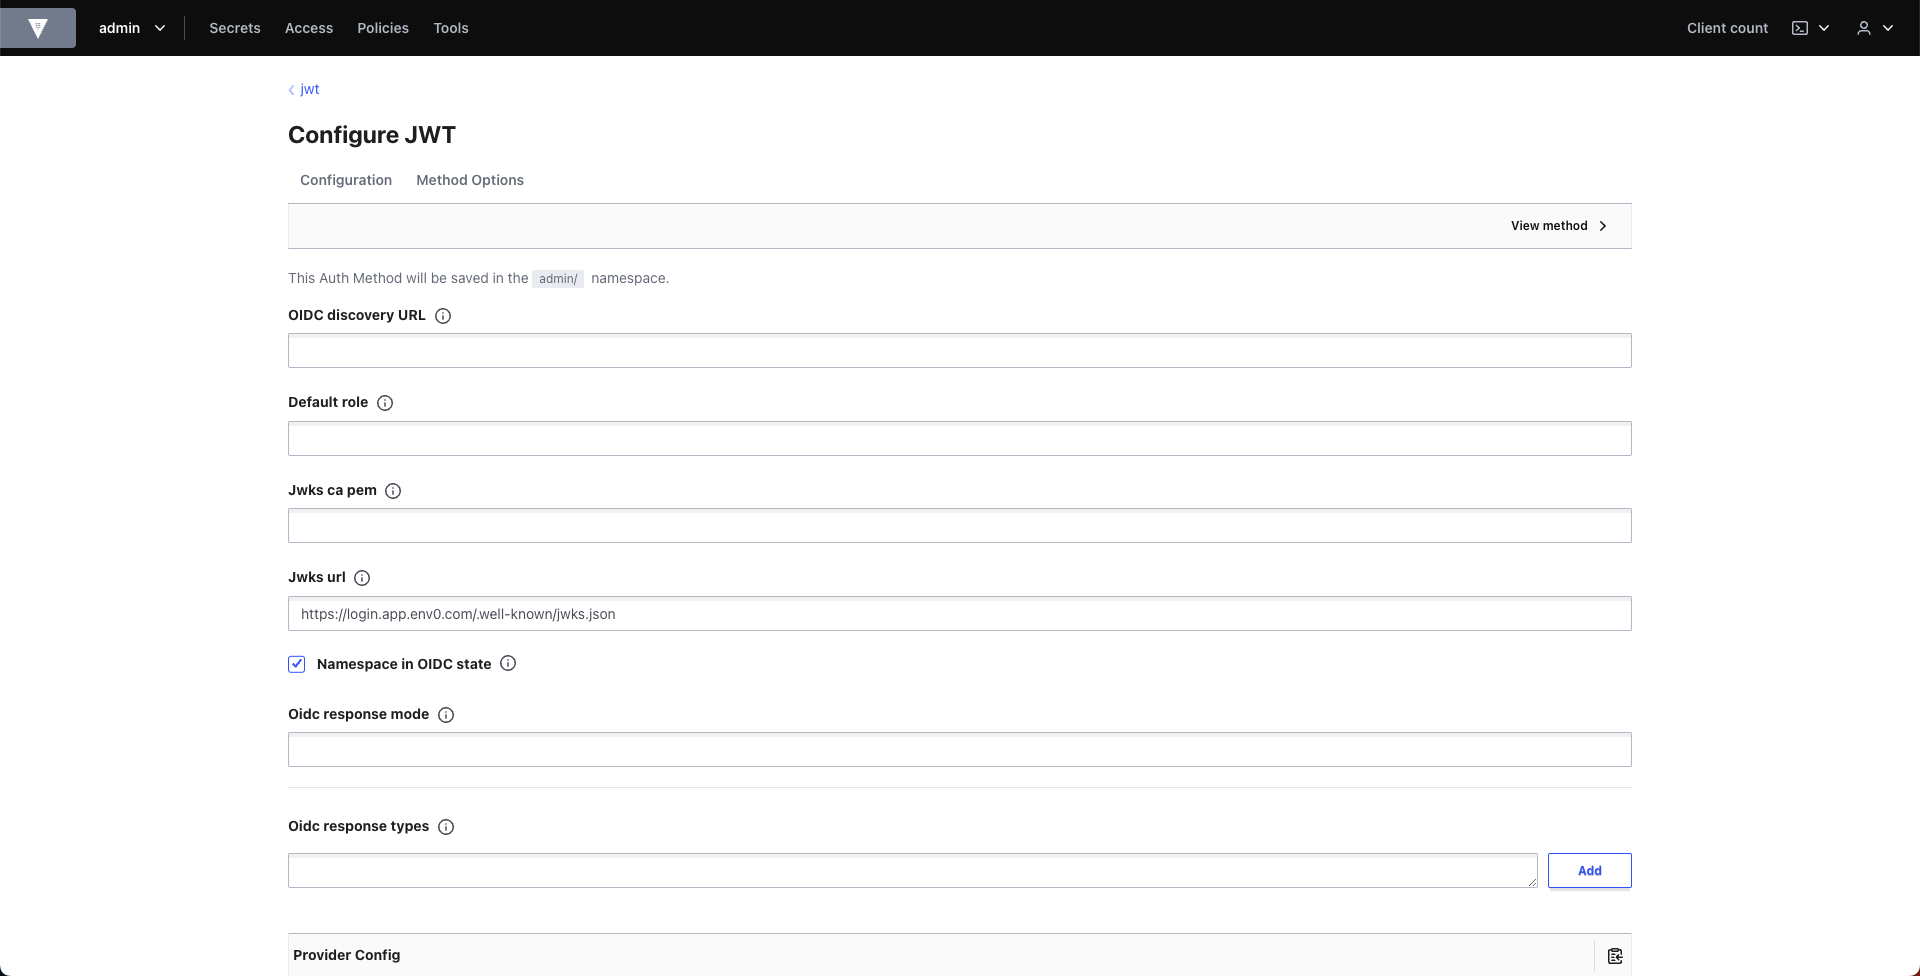
7. In the `Configure JWT` page under the `Jwks url` enter `https://login.app.env0.com/.well-known/jwks.json`
8. Expand `JWT Options` and set the `Bound issuer` to be `https://login.app.env0.com/`
9. Click on the `Save` button
 ## Setup Secrets Store and Create Policy
Create a KV store in vault to save and fetch secrets.
```shell theme={null}
vault secrets enable -path=secrets-for-env0/ kv
```
A policy needs to be created to define which secrets can be accessed. Here's an example:
```shell theme={null}
vault policy write env0-access - <
More Claims
In this example we only set the `aud`, the `organizationId` and the `apiKeyType` claims, however you can also set any additional claims you would like from the list of claims we support. The list is located [here](/guides/integrations/oidc-integrations/#format-of-the-openid-connect-id-token)
## Authenticating to Vault with env zero Credential
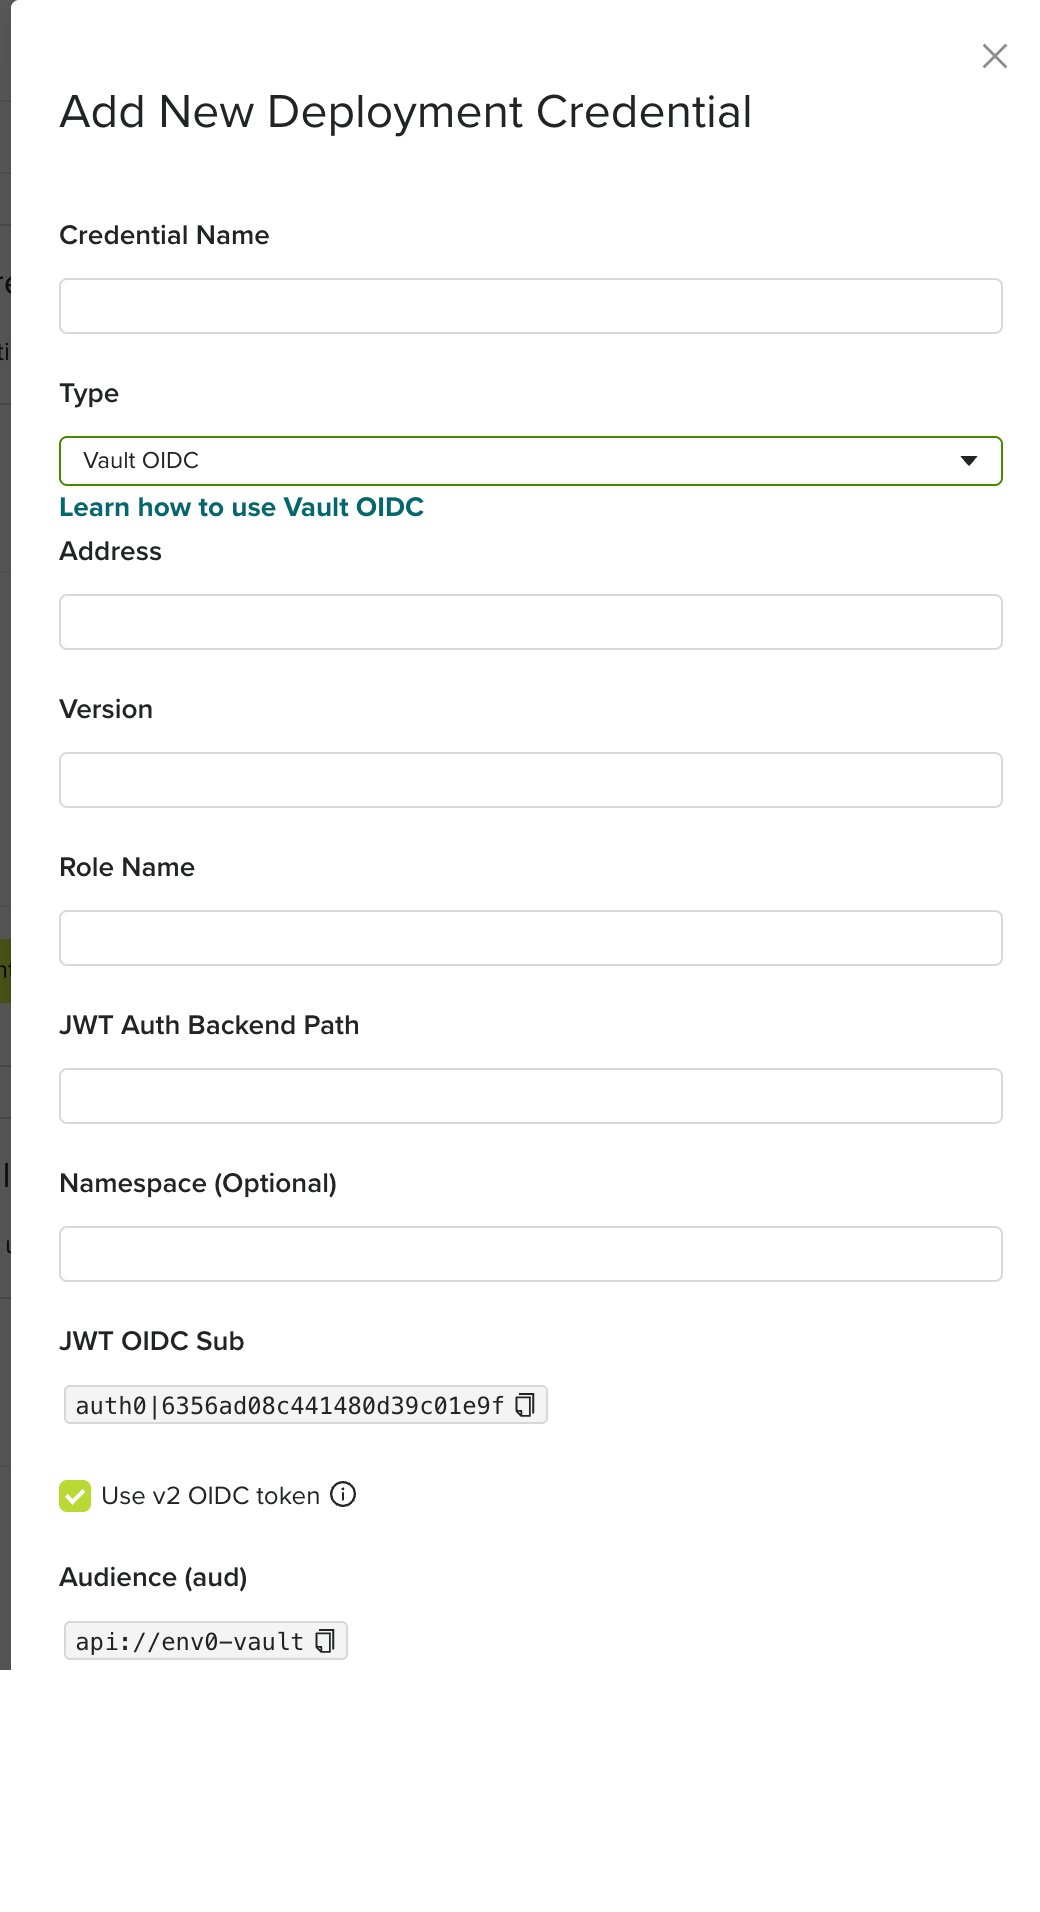
Go to the organization's credentials page and create a new deployment credential. Select `Vault OIDC` type and enter the following fields:
* `Address` - The vault address, including port
* `Version`- The vault version to use
* `Role Name` - Vault role name
* `JWT Auth Backend Path` - Path to the new authentication method
* `Namespace`- Optional, the vault namespace
* **Use v2 OIDC token** - check this box so env zero mints a token with the `api://env0-vault` audience set in the role's `bound_audiences` above. The form shows the resulting `Audience (aud)` value. Leaving it unchecked produces a v1 token (`aud: https://prod.env0.com`), which the role will reject unless that audience is also bound.
## Setup Secrets Store and Create Policy
Create a KV store in vault to save and fetch secrets.
```shell theme={null}
vault secrets enable -path=secrets-for-env0/ kv
```
A policy needs to be created to define which secrets can be accessed. Here's an example:
```shell theme={null}
vault policy write env0-access - <
More Claims
In this example we only set the `aud`, the `organizationId` and the `apiKeyType` claims, however you can also set any additional claims you would like from the list of claims we support. The list is located [here](/guides/integrations/oidc-integrations/#format-of-the-openid-connect-id-token)
## Authenticating to Vault with env zero Credential
Go to the organization's credentials page and create a new deployment credential. Select `Vault OIDC` type and enter the following fields:
* `Address` - The vault address, including port
* `Version`- The vault version to use
* `Role Name` - Vault role name
* `JWT Auth Backend Path` - Path to the new authentication method
* `Namespace`- Optional, the vault namespace
* **Use v2 OIDC token** - check this box so env zero mints a token with the `api://env0-vault` audience set in the role's `bound_audiences` above. The form shows the resulting `Audience (aud)` value. Leaving it unchecked produces a v1 token (`aud: https://prod.env0.com`), which the role will reject unless that audience is also bound.
 After creating the credential you will need to go to the relevant project and assign that credential to the project in the project's credentials page. Now all environments within the project will have the relevant environment variables available.
## Authenticating to Vault with Terraform Provider
To configure the vault terraform provider all you need is the vault provider block and the `VAULT OIDC` deployment credentials set on the project. Example:
```hcl theme={null}
provider "vault" {
address = var.vault_address
skip_child_token = true # (depends on your role vault policy)
}
```
The `VAULT OIDC` deployment credentials are used to authenticate with the vault server along with the `ENV0_OIDC_TOKEN` JWT token which then sets the `VAULT_TOKEN` variable with the actual session token that is returned from the vault server used for authentication/authorization.
## Migrating an existing v1 credential
If you already authenticate to Vault with a v1 env zero OIDC credential, your JWT role's `bound_audiences` is `["https://prod.env0.com"]`. Because `bound_audiences` is a list, you can bind the v2 audience alongside the old one and migrate without downtime:
1. **Add the v2 audience to the role.** Update the role to bind both audiences, keeping the old one for now:
```shell theme={null}
vault write auth/jwt/role/$VAULT_ROLE_NAME - <
After creating the credential you will need to go to the relevant project and assign that credential to the project in the project's credentials page. Now all environments within the project will have the relevant environment variables available.
## Authenticating to Vault with Terraform Provider
To configure the vault terraform provider all you need is the vault provider block and the `VAULT OIDC` deployment credentials set on the project. Example:
```hcl theme={null}
provider "vault" {
address = var.vault_address
skip_child_token = true # (depends on your role vault policy)
}
```
The `VAULT OIDC` deployment credentials are used to authenticate with the vault server along with the `ENV0_OIDC_TOKEN` JWT token which then sets the `VAULT_TOKEN` variable with the actual session token that is returned from the vault server used for authentication/authorization.
## Migrating an existing v1 credential
If you already authenticate to Vault with a v1 env zero OIDC credential, your JWT role's `bound_audiences` is `["https://prod.env0.com"]`. Because `bound_audiences` is a list, you can bind the v2 audience alongside the old one and migrate without downtime:
1. **Add the v2 audience to the role.** Update the role to bind both audiences, keeping the old one for now:
```shell theme={null}
vault write auth/jwt/role/$VAULT_ROLE_NAME - <